In this post: A detailed, step-by-step guide demonstrating the steps I use to solve a problem similar to one encountered in my CS 372 Intro to Networking class.
You’re given a link with a maximum transmission rate of 70.5 Mbps. Two computers, X and Y, want to transmit starting at the same time. Computer X sends File X (18 MiB) and computer Y sends File Y (130 KiB), both starting at time t = 0.
Statistical multiplexing is used, with details as follows
Packet Payload Size = 1000 Bytes
Packet Header Size = 24 Bytes (overhead)
Ignore Processing and Queueing delays
Assume partial packets (packets consisting of less than 1000 Bytes of data) are padded so that they are the same size as full packets.
At what time (t = ?) would File X finish transmitting?
Suppose they want the answer in seconds (hah – not milliseconds like usual!) and they want it rounded to two decimal places.
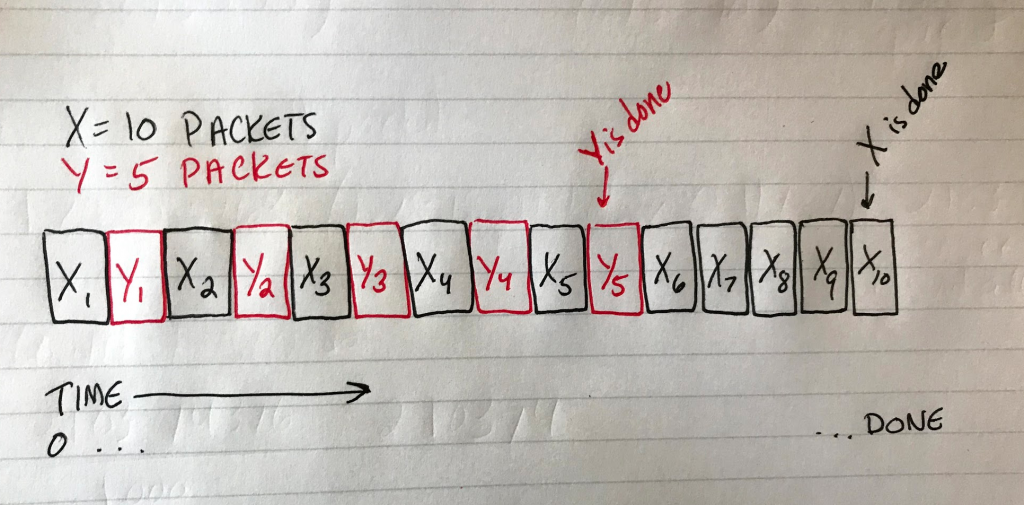
The “twist” of this problem is that File X and File Y take turns being sent in little chunks of 1000 bytes (plus 24 bytes of overhead).
First a piece of X goes, then a piece of Y, then back to X, etc.
Y is smaller so you run out of Y before you run out of X, but fortunately for us, this problem wants to know when X is done being sent. So really what we’re looking for is how long it takes to send both X and Y.
Here’s a drawing I made to visualize the problem (obviously, X and Y are both way more than just 10 and 5 packets in our real problem).
Diagram depicting X1, Y1, X2, Y2, X3, Y3, X4, Y4, X5, Y5, X6, X7, X8, X9, X10 interwoven with each other. Each block represents a packet.
Step 1: Figure out how many packets have to be sent, total
Our packet size (1000 bytes) and our overhead size (24 Bytes) are given in bytes, so I’m going to turn the two filesizes into Bytes instead of bits for this one. (We can always turn it into bits later if needed.)
File X = 18 MiB // turn to bytes by multiplying by 1024 twice
= 18 * 1024 * 1024
= 18874368 bytes
File Y = 130 KiB // turn to bytes by multiplying by 1024 once
= 130 * 1024
= 133120 bytes
Now X and Y are in the same units (bytes) and we can use that to figure out how many packets of 1000 bytes each one would be divided into.
File X = 18874368 Bytes / 1000 = 18874.368 packets
Our result isn’t a whole number. What should we do with the “partial packet”? Well, the problem tells us that any partial packets should be padded up to a full size. In practice, this just means we round up to the next nearest whole number. 18874.368 becomes 18875 packets for File X.
Now do the same for File Y:
File Y = 133120 Bytes / 1000 = 133.12
Round up to get 134 packets for File Y
(Save these numbers for later, we’ll come back to them.)
Step 2: Calculate the time needed to send one packet plus its overhead
Add the packet size and the overhead size (both must be in the same units; here, that’s bytes but your variation of this problem may differ). Since transmission rate is in bits, let’s also multiply the packet size + overhead size by 8 to put it in bits, and multiply the transmission rate by 10^6 to put it in bits also. That looks like…
L/R, where R's units is what the outcome of this calculation will be
= (1000 Bytes + 24 Bytes * 8) / (70.5 Mbps x 10^6)
= (8192) / (70.5 x 10^6)
= 0.0001161985816 seconds // same units as R (bits per second)
= 0.11619858156 msec // multiply by 1000 to get milliseconds
We now know that it takes 0.11619858156 milliseconds to send one packet (and its overhead). Save this number for later.
Step 3: Calculate the time it takes to send all packets
This step is easy: we know how many packets we have between File X and File Y, and we know how long it takes to send one of them, so let’s figure out how long it takes to send all of them.
18875 packets + 134 packets = 19009 packets to send
19009 packets x 0.11619868156 msec = 2208.820738 milliseconds to send all
Step 4: Convert to seconds and round to 2 decimal places to get the final answer
This variation of the problem wants the solution in seconds, so divide our result from Step 3 by 1000 to get 2.208820738 seconds and round it to two decimal places to get 2.21 seconds, which is when time at which File X will be done sending.
What if it wanted to know when the smaller file was done sending?
Well, let’s look at our diagram again. Here we can see that for every packet of Y sent, a packet of X has already been sent.
For every packet of Y that is sent, one from X precedes it. In other words, to send all 5 packets of Y we must also send 5 packets of X.
We know Y is made up of 134 packets, so that many packets of X will also be sent. That means for our final answer all we have to do is figure out how long it’ll take to send 134*2 packets.
134 * 2 = 268 // all of Y + same amount of X
268 packets x 0.11619868156 msec = 31.14124666 msec to send File Y
Convert that answer to seconds and there we have it: 0.03 seconds have elapsed when File Y (the smaller file) is done sending.
In this tutorial: structuring and scripting a simple RPG-style character creation screen using Godot’s built-in containers and Godot script
What we’re building
I recently added a menu to my game that lets the player create their own custom character for the game.
In the context of my game, that means:
naming the character
selecting the character’s head sprite
choosing the character’s class
This work managed to touch on a lot of concepts, so I thought I’d share my work here in hopes that it’ll help someone else. I’ve been working in Godot on a hobby project for about 5 months now and I think the engine is great but could use a few more tutorials and “here’s how I did it” type stuff, so here we go.
Some of the things covered in this guide include:
Godot’s container system (VBoxContainer, HBoxContainer, etc)
Building a simple menu out of Godot nodes
Hooking that menu up to the rest of the game
Changing scenes
Altering aspects of a “hero” scene, such as its name and head sprite
Lots of Godot script examples
PS: The project I’m using for this guide already exists (in some capacity), so there are references to things that are already built prior to this guide. Hopefully this “slice” of the game’s development is still helpful to someone, even if it doesn’t start from scratch.
Structuring the scene: Godot container types explained
The first thing I did was make a new scene and add a Node2D to serve as the parent node and a VBoxContainer as its child to hold all of the major elements of this menu. The first child of the VBoxContainer is a label.
My new scene is called createHero.tscn
Let’s talk about structuring a menu in Godot.
For a menu with many “sections” or “elements” that read top-to-bottom, use a VBoxContainer. The VBox stacks its children elements vertically (one on top of the other) which saves you from having to position each one individually and from having to worry about overlapping elements. You can also control the VBox’s width and the spacing between its child elements.
Each element in the stack can be something simple, such as a label or a button, and it will occupy as much vertical space as it is tall. Nothing will overlap it. Or, each element could be something more complex, such as an HBox (which would let you create a row of buttons, labels, or similar).
This system takes a little practice to get used to, but hopefully this diagram made of children’s blocks helps clarify the general concepts.
This stack represents a VBox with child elements. Each “row” is a container, element (such as a label or a button), or an HBox with child elements of its own.
For the sake of brevity I’ve skipped ahead to my assembled scene. This builds on the concepts already explained.
My scene now contains a VBox parent with three children: a label, an HBox, and another HBox.
For now, it’s just made out of unskinned/unstyled Godot nodes.
Some things of note:
There’s an open space below the “Create Hero” label that I will use to display the hero art later on
“container_spacer” is a generic Container node. I set its minimum width to 420 so that the other thing in the HBoxContainer2, the “Rename” button, gets pushed to the right side of the screen.
The hero class (Cleric, Druid, Ranger, etc.) buttons are in an HBox that manages their left-to-right spacing
Getting to this new scene
I made a little button on the main screen of my game to access createHero.tscn.
This is just temporary so that I can access the new menu for testing.
Eventually, this “Create a character” screen will be the first thing the player sees when starting a new game, but I don’t want to clutter the new game startup flow with an unfinished (possibly broken) menu yet.
Here’s the button on my main game scene:
I hooked up its button press signal (I just go with the default function name Godot suggests):
And the code:
If you’re following along at home, all you need is the last line, the one that begins get_tree()… as the other two lines are specific to my game.
With that button hooked up, I can now run my game and click the temporary button to get into my new menu.
Here it is in-game. No, it’s not beautiful. but we gotta start somewhere!
Creating a script file for this menu
For this menu to actually do anything I’m going to need a script file for this menu (or this scene, to use Godot’s parlance). To create a script file for the scene I click on Node2D and go into the Inspector tab. I selected New Script and let Godot create a new script for me.
With Node2D selected, go down to Script and selected New Script. I just take the defaults most of the time in Godot. This stuff is all fine as-is. I click “Create” and let it make the new script file for me.
Adding an instance of the Hero scene to the Create Hero menu
Usually with a character creator you want to show a preview of the character being created. For the game I’m working on, that means making an instance of the Hero scene and attaching it to the menu so the player can see their character preview.
(The Hero scene already exists in my project. I won’t cover it in this tutorial, but you can see the code that makes up a Hero scene and the hero generator by viewing these gists I made for the sake of this guide: hero.gd, baseHero.gd, heroGenerator.gd. You don’t need to look at or understand these files to follow this guide, but you may find them helpful if you are trying to build something similar.)
Here’s how hero.tscn looks in my project, structurally speaking:
Back in createHero.gd, we have to add some code in order to see the hero scene in the menu. The project already has a heroGenerator file that I use to make random heroes for the player’s guild. Here, the heroGenerator file is used to make a single hero and present it to the user in this menu. The general idea here is to generate a random hero, show it to the player, and then let the player customize it to their liking (just like how “create a new character” works in a lot of MMO type games).
Code for generating a hero, adding it to the guild roster, creating a scene instance for that hero, and adding the instance to the menu scene. View this code as a gist.
Here’s how it looks in-game:
Ta-dah: a hero character instance now exists in the menu.
Making the “Rename” popup and functionality
There are a few things we have to do to get the rename popup working:
Add the popup node itself (a ConfirmDialog node)
Give the popup a TextEdit field so the player can enter a name
Make the popup appear when the user taps the Rename button
Write the script that accepts the new hero name
Update the hero’s data to keep the new name
Add a random name generator button
Name validation (not part of this tutorial but for a real game you’d probably want this)
First, the popup.
Godot has some dialogs (popups) built in. The “Rename” popup is going to be a ConfirmDialog with a child LineEdit. The LineEdit is a field for the user to type in. This guide’s game is imagined as an Android/iOS game, and LineEdit conveniently brings up the keyboard on those devices.
I made this confirmation dialog into its own scene since the rename functionality will be used elsewhere in the game. (To do that, right click the ConfirmDialog in the Scene tree, click Save Branch As Tree, and save it as its own scene.)
If you don’t make a ConfirmDialog its own scene, its Ok button script can just go in your parent scene’s .gd file.
If you do make ConfirmDialog its own scene, its Ok script will be in its own file.
Either way works, I just like to make anything used in more than one place into a scene so I don’t have to maintain code in two places.
Hooking up the Rename button to open the popup
Now that we have the confirm popup scene made, let’s make it so the “Rename” button actually opens the ConfirmDialog (which I’ve named confirm_rename_dialog). Godot makes this really simple.
Select the Rename button and navigate to its pressed() signal.
Select the “Rename” button and navigate to its Node signals. Highlight pressed() and click the Connect… button in the lower right.I’m happy with the method name Godot suggests, so I click Connect and let it create the method. Here’s the empty method Godot created. And here’s all the code it needs to open the dialog. get_node(“confirm_rename_dialog”).popup()
If we tried it in-game now, we would be able to open the popup and type a name but not actually save our new hero name.
Saving the user’s input to the hero
To make the “OK” button actually do something, we have to go into the confirm_rename_dialog scene and attach a script file to the scene. I made a new script file for this ConfirmationDialog.
In the Node signals panel, the confirmed() entry is what is triggered when the user presses OK. I connected it to an empty function.
Click confirmed() and then click Connect to generate a function in the popup’s script file.
Godot makes it realy easy to grab the user’s input from the LineEdit. Just write:
var newName = $LineEdit.text
and then do something with newName. In my case, that meant updating the selected hero’s heroName to be the value of newName.
(Note there’s no attempt at validation in this example, so the user can enter anything they want right now. For a real game, you’d probably want to keep names under a certain length and filter out numbers, special characters, symbols, emoji, and possibly dictionary words and profanities.)
But what’s this signal business? Well, the popup is a separate scene from createHero, so it has to communicate with its parent scene. Godot does that with signals.
Declare the signal (line 3) and then emit it (line 12). It’ll be caught by the code up in createHero.gd.
Back in createHero.gd I’ve had to make a few changes. There’s now a draw_hero_scene() method because I think we need to clear and redraw the hero scene from at least two places in the code, so I took it out of _ready and made it its own function.
I also attached the redrawHeroName signal to the confirm_rename_dialog instance, so that it can “listen” for the signal and call “update_hero_name” when the signal is “heard”. All update_hero_name() does is free the existing hero scene (clear it from the stage) and make a new one. This draws a new hero instance with the new name.
I’ll probably rename update_hero_name() to something more generic once I give the user the ability to modify the hero’s appearance and class.
Let’s try it out in game before moving on:
User types anything they want (seriously there’s no validation yet)Success! And it doesn’t even flicker. I was afraid it would flicker.
Making the “hero class” buttons (radio buttons)
Next up: changing this hero’s class.
A hero can only be one of the available classes (ie: she can be a Wizard, or a Warrior, or a Cleric, but not more than one of those options). When the player picks a choice, the others are “deselected”.
This is a lot like how “radio buttons” on the web work. Pick one choice, the others are “un-picked”. Godot actually has something for this: a button group! A button group is somewhat convoluted to set up.
First, select one of the buttons we want to add to the (not-yet-created) button group. In the inspector tab, scroll down to Group. Click where it says <null> and then choose New ButtonGroup.
Click on New ButtonGroup to view its inspector pane. Go to Save As… to save it as a .tres.
Saving it lets us load it onto all the other buttons.
Select all of the remaining buttons and click the field next to Group. Choose Load and then choose the saved .tres file. Now all of the buttons are in the createHero_classButtonGroup.
Let’s try it in-game.
Here we have Cleric selected.…and here we have Druid selected. (The faint blue border indicates which one is selected.)
Making these buttons mutually exclusive will help with styling later on and allows us to quickly “deselect” the user’s previous choice and highlight the new current choice. (The highlight on these default Godot buttons is a thin blue border that might be difficult to spot at first.)
Changing the hero’s class (in data)
This step is going to require some refactoring. Currently, there is no mechanism in the game to change a hero’s class. A hero is given a class and a matching gear loadout by the heroGenerator.gd file and that’s it.
Our refactor will need to:
Change the hero’s class
Change the hero’s starting gear to match that class
Change the hero’s starting stats
Do not change the hero’s name or head (these might already be set by the player, but if we just generate a new hero they will also be re-generated)
I had to do some refactoring here…
So this next part is kind of a tangent and really specific to my project, but I wanted to include it and not just hand-wave it in case it’s valuable to someone who reads this (hello, future me, probably).
Currently, the hero’s starting gear is handed out in heroGenerator. A hero already has a “give_new_item” method that accepts a string (must match an item in the game’s static data) to create an instance of the item and assign it to the hero’s equipment object. Here, giving a character its starting gear is done with multiple calls to give_new_item on the hero class.
The old way of giving gear was done line-by-line.Hero.gd has this method to find the item (by its name as a string) in staticData.items and stick it on the hero in the correct equipment slot.
The problem with how this is currently done is that this “gear assignment” step happens when the hero is generated for the first time, and then does not (or cannot) happen again. But if you change a brand-new character from a warrior to a wizard, you need to wipe the warrior gear and replace it with wizard gear. I could probably do this out of methods that already exist on the hero for giving and taking equipment, but I have an idea for something cleaner: a “gear loadout” system, whereby gear sets exist in staticData and are assigned to a hero in one fell swoop.
Here’s a quick look at the changes I did during this refactor. I won’t cover every last step, just a high level of how this stuff works in my game.
Added a new data sheet: In my game data Google Sheet, I made a new tab and set up some gear loadouts like so. (The fields are restricted to just items that actually exist in the Items tab of the game data workbook.)
This gets exported as a json:
And then I go over to the tool I wrote to process individual JSON files into my Godot project’s staticData.gd file. (This deserves its own tutorial, but for now you can check it out as a gist here if you like.)
Parsely (a tool I wrote for this project to turn .json data into objects in a .gd file) now handles this new loadouts.json fileAnd now var loadouts is an object in staticData.gd.
And now var loadouts = {…} exists in staticData.gd. Since staticData.gd is an AutoLoaded file, this means that my game’s code can retrieve a specific loadout by id like so, from anywhere in the project:
var gearSet = staticData.loadouts[“clericNew”]
Updating hero.gd Now that we have the concept of gear loadouts, it’s time to update the hero class with the ability to use them.
Now you can call hero.give_loadout(“clericNew”) and get all the gear associated with that loadout.
For now, the give_loadout() method is also going to delete any armor already on the hero, since this feature is only used during the creation of a new hero and we don’t want to keep all the gear generated by changing class. I don’t think give_loadout() will be used outside of character creation and testing purposes so for now this is fine.
Writing the change_class() method in hero.gd
Finally, I have everything needed to write change_class(). Now we can write hero.change_class(“Cleric” and that hero will become a cleric, complete with the default newbie cleric gear.
One last thing to do before calling this refactor complete: update the heroGenerator.gd code to use loadouts instead of one-by-one gear gifting like we saw earlier in this guide.
heroGenerator.gd now uses give_gear_loadout() to assign gear sets to newbies. Remember, the gear loadouts themselves are stored in the spreadsheet data now, so there’s even some validation (in the Google Sheet) that the user picked a gear item that actually exists. Win-win all around.
Okay, NOW we can finish what we came here to do: clicking the class buttons should change the new hero’s class and change all of its starting gear to match.
Back in createHero.gd, we hook up each hero class button to a bit of code that calls change_class on the selected hero (the one we are viewing). I’m sure there’s some more efficient way to do this but for a small set of buttons this makes it pretty clear what’s going on. Remember how I thought we might change “update_hero_name()” to something more generic? Well now it’s “update_hero_preview()” because we also call it after changing the hero’s class.
Let’s try it out in game. Here our new hero is a Wizard.
And now she’s a Warrior, with the right gear and without losing the head graphic or name the user picked for her.
Phew – the refactoring detour is done. Yay!
There’s just one thing I want to do before calling this particular piece of work (and this little guide) done, and that’s give the user the ability to change the hero’s head.
Selecting a head sprite and saving that choice
There’s lots of head sprites in the game already. Currently, the only “race” (in the fantasy sense) you can play as is humans.
The game already has a concept of “male” and “female” head sprites. The lists of those sprite filenames are kept in two separate arrays, like so:
The heads are already in two arrays for the sake of the random hero generator, but the player gets to pick from all possible heads.
There’s no gameplay concept of gender, and separating heads into two arrays was just something I did to help the random hero generator pair the more masculine-looking (bearded, balding) heads with the more masculine names, and vice versa with the more feminine-looking heads and names.
This is important because when the player makes their own character the player gets to pick from ALL the heads, not just a subset of heads. So I’m going to have to combine them into one array for the sake of cycling through them in the create hero menu, while still keeping them as two separate arrays for the hero generator.
Originally, the head arrays were in heroGenerator.gd. That wouldn’t work going forward, though, since I now needed to access them from createHero.gd (the create hero menu scene) and by the time we’re in createHero, the generator is done doing its thing and we don’t want to go back “into” it and access some arrays in it.
I realize that sounds confusing: the goal is to make the head arrays exist on the hero so they can be accessed from both createHero and heroGenerator.
I moved the head arrays to baseHero.gd, which is where I keep all the base hero stats data (hero.gd extends baseHero.gd and inherits everything in it).
baseHero.gd now contains all the head sprite data
I had to make a minor update to heroGenerator.gd, telling it to look on the hero itself for the head sprite arrays instead of at a variable local to itself. Now that the arrays are on the hero, though, they can be grabbed by either heroGenerator or createHero.gd.
heroGenerator.gd beforeheroGenerator.gd after – the humanMaleHeads and humanFemaleHeads are now on newHero
Over in createHero.gd, I added two new vars: allHumanHeads = [] and headIndex = -1.
I added code in _ready() to build a new array, allHumanHeads, out of the two separate male and female head arrays. It also figures out which index the hero’s starting head is at, so we can use that head as the starting point in the array when we press the “Previous Head” and “Next Head” buttons.
Adding the buttons
This part should look familiar – in the createHero scene I added another HBox (HBoxContainer3 in the screenshot) and centered two buttons inside it.
These buttons have to cycle through all the possible heads. Still in createHero.gd, I attached the “Prev Head” and “Next Head” buttons to two new functions:
I also added some logic to handle the “wrap around” effect that should occur if the user clicks “prev” or “next” enough to reach the end of the head array.
Finally, in hero.gd I added a very short method called change_head. All it does is take the string of the new head sprite (such as “female_head_01.png” and update headSprite on that hero.
Pass in a string representing the filename of the new head sprite and this method updates the hero instance to use that new head sprite.
End result: changeable heads!
This menu could be prettier, but styling it is a topic in and of itself and this guide is already huge.
Final steps: testing the results of the character creator
The very last step is to hook up the “Create hero!” button at the bottom of the menu. Technically, the hero was already created. All we did was modify that already-created hero’s class, head, and name. This button just has to take the player to the main scene.
I hooked up the Create hero! button to this script in createHero.gd…
I customized a hero… (she was originally a warrior with a different name and head)
And confirmed she is now part of my guild. Here’s “Tidbit Littlebit” with the group:
There she is!
Checking in the Guild Management screen…
And checking her hero page (to ensure she has the correct stats):
Looks good!
I wanted to make a guide showing some of the work I’ve done in Godot, mostly just to help support what I think is a great game engine for indies and hobbyists. If you found this helpful, let me know in the comments!
In this tutorial: disabling buttons and tinting their icons (sprites) a darker color to indicate that they cannot be interacted with by the player.
What we’re making
Here’s my game’s item vault. It displays a grid of buttons, each one representing an inventory “slot” and each button can be used to display an item the player actually owns. There’s an icon and a slot label to help the player understand what each item is (ie: a sword, a robe, a pair of boots, etc.)
This is great for viewing all the items, but sometimes the player wants to fill a specific slot on their character. Here’s what the character page looks like:
When the player goes to select, for example, a “jewelry” item for their character to wear, I want to make it easy to spot which items in the inventory vault are actually jewelry.
To do this, I will write script that figures out which items are not jewelry, disable their buttons, and tint their icons a darker color. The end result should look something like this:
(I could have just hidden all the non-jewelry items, but I think having items “move around” on the player would be confusing. Tinting the non-jewelry items seemed, to me, anyway, like the better user experience.)
Setting it up in script
The initial creation of the inventory button instances takes place in my game’s “vault” scene. Below is a simplified version of my game’s code that (hopefully) demonstrates how the grid of buttons is created and populated with icons and labels. (PS: I have a separate tutorial specific to making a grid of buttons just like this.)
Thematically, the vault represents a shared inventory across all of the player’s characters in my RPG-style game. The shared inventory is represented as an array named global.guildItems.
Each inventory “slot” is represented as an itemButton instance (itemButton is a scene I created, we’ll look at it more closely in a bit).
The first method, _position_vault_buttons(), creates the blank buttons and places them in a grid, the second method, _draw_vault_items(), “populates” them with actual items from the inventory.
This way, we always get X number of buttons, where X is the total capacity of the player’s inventory, and only some of them are used to “hold” the items the player actually owns.
(A lengthier explanation of how I know which item slot to filter by is outside the scope of this tutorial, but it’s done with a global flag set by the heroPage and you can see evidence of it in this code sample below about 6 lines from the end. It’s the one that goes “if (global.guildItems[i].slot != global.browsingForSlot):”)
#vault.gd

func _ready():
  #display inventory size and capacity
  _position_vault_buttons()

func _position_vault_buttons():
  #this method handles the STRUCTURE of the buttons
  #it places the empty buttons in the grid
  #use _draw_vault_items() to put icons and data into buttons
  for i in range(global.vaultSpace):
    var itemButton = preload("res://menus/itemButton.tscn").instance()
    itemButton._set_vault_index(i)
    itemButton.connect("updateSourceButtonArt", self, "_draw_vault_items")
    $centerContainer/grid.add_child(itemButton)
    buttonArray.append(itemButton)
    _draw_vault_items()

func _draw_vault_items():
  #now we pair each physical button with data from global.guildItems array
  #grab each button from buttonArray and "decorate" it
  var currentButton = null
  for i in range(buttonArray.size()):
    currentButton = buttonArray[i]
    if (global.guildItems[i]):
      currentButton._set_label(global.guildItems[i].slot)
      currentButton._set_icon(global.guildItems[i].icon)
      currentButton._set_data(global.guildItems[i])
      if (global.currentMenu == "vaultViaHeroPage"):
        if (global.guildItems[i].slot != global.browsingForSlot):
          currentButton._set_disabled() #script I wrote in itemButton.gd
        else:
          currentButton._clear_label()
          currentButton._clear_icon()
          currentButton._clear_data()
About 4 lines up from the bottom is this line of code:
currentButton._set_disabled()
That _set_disabled() method is a method I wrote on the itemButton’s script, it’s not something built into Godot.
Let’s take a look at the itemButton scene and see how it works.
itemButton scene and script
An itemButton, in my game, is made up of a Button node along with a couple labels and a sprite.
Here is the scene’s structure:
Here is the script that disables the button and dims the sprite over the button:
The tricky part here, for me, was figuring out how modulate works. The Godot docs are thin on examples and it took some Googling just to figure out that the key word here was “modulate”, not “tint” or “color” or other terms I was initially guessing.
Some things to note about “modulate”:
Modulate is a property, so you can set it using “dot” notation.
It uses Color, which is built into Godot.
set_modulate and get_modulate are the old way of working with modulate (if you see reference to them the guide you’re reading/watching was probably made prior to Godot 3)
In this tutorial: The scene structure and settings I used in the Godot 3 engine to achieve this amazing centered grid of evenly-spaced buttons. The buttons themselves are all instances of the same scene and are placed in the grid programmatically.
This is my “finished” result (pardon the placeholder assets). It’s a simple hero inventory page for an RPG. The buttons that make up the hero inventory are evenly spaced in a grid, and that grid is centered horizontally on the screen:
This guide will show you the code and the scene structure used to achieve this centered-grid-of-centered-buttons, but it assumes some familiarity with the Godot engine and will skip over some of the basics.
Scene hierarchy and container settings
This “Hero Page” is its own scene. This scene is named heroPage.tscn (and its script is in heroPage.gd). We’ll come back to its script at the end of the tutorial. For now, we’re working in the scene’s hierarchy.
The parent-most node is a Node2D, and the important bits here for the centered grid of inventory items are:
a CenterContainer (which I renamed to centerContainer)
a GridContainer (which I renamed to grid)
(You could make this stuff programatically if you prefer but I like to see a certain amount of my UI in the viewport – at least the outlines of containers, where possible.)
I positioned my CenterContainer where I wanted it on the Y axis and gave it a width equal to that of my screen and left the rest alone.
Doesn’t look like much in the viewport yet – just a thin horizontal line.
That’s okay – the buttons themselves will bulk it out.
The next step is to adjust the grid’s settings. I changed the number of columns to 4 and under Custom Constants, I changed Vseparation and Hseparation to 24 (to put some space between each of the buttons).
The button instances
The square buttons are all instances of the same “itemButton” scene (that I made myself). That scene looks like this in the 2D viewport and scene hierarchy:
Unlike the grid or center container, I gave the button’s Control parent a size and a minimum size.
Generating the buttons with script
Finally, the code that adds the buttons to the grid is in the heroPage.gd file itself. This code goes in the _ready() method.
for i in range(heroEquipmentSlots.size()):
   slot = heroEquipmentSlots[i]

   var inventoryBtn = preload("res://menus/itemButton.tscn").instance()
   inventoryBtn._set_label(heroEquipmentSlotNames[i])

   #only set icon if the hero actually has an item in this slot
   #otherwise leave it empty
   if (global.selectedHero["equipment"][slot] != null):
      inventoryBtn._set_data(global.selectedHero["equipment"][slot])

   $centerContainer/grid.add_child(inventoryBtn)
I simplified some of the above code from my actual project for readability. The important parts are where it generates an instance of each inventory button and pushes the label and data into that instance, then adds the button to the grid.
The end result
The hero’s eight inventory slots are now in a grid and neatly centered. (I can’t say the same for the rest of the elements on this page yet, but it’s a start!)
There are several Python unit testing frameworks, but pytest is both the most popular and the easiest to use. It requires no boilerplate, no imports, no API. Just name your files, classes, or methods starting with “test”, type py.test into the command line, and observe the results.
Simple, right? And we want it that way. Pytest allows our tests to be uncluttered and easy to read. But as far as the output of those tests goes… we can do better! This article will show you how to master the pytest CLI.
To start off, make sure you have pytest installed:
pip install pytest
For those of you new to pytest, note that the package is named “pytest”, while the command to run it is “py.test”. The dot remains for historical reasons: pytest used to be part of the “py” library.
If you already have pytest installed, double-check your version number:
py.test --version
This guide is written with pytest version 2.7.0 or greater in mind. If you have an older version, you can upgrade using pip:
pip install --upgrade pytest
All good? Let’s get started!
Useful Switches
-x : Stop After First Failure
When you’re trying to track down a bug, it can help to run all of your tests, so that you can draw conclusions based on what groups of tests are failing.
That said, sometimes you just want to work through failing tests one by one, or there are so many tests in your project that running them all every single time (not to mention sifting through all the output) would be too time-consuming. There’s a nice simple switch to take care of this:
py.test -x
This will stop pytest after the first failure is encountered, saving you oodles of time. Is one just not enough? How about after two failures? No problem!
py.test --maxfail=2
-k : Run Tests Matching Keywords
What if you know some group of tests is going to fail, but you just don’t want to think about them right now? You could go through your test files and comment them out… but there’s a much better way! Let’s say you only want to run tests with the word “log” in the names:
py.test -k “log”
Easy… but wait! This also ran the tests with “logout” in the names. Let’s say we don’t want those:
py.test -k “log and not logout”
That’s right! Instead of just a simple string match, you can feed -k a full expression to use.
Controlling Verbosity
Of course, if you want to run all your tests, but just make them run more quietly, you can tone down their output like this:
py.test -q
The opposite is increasing the output, which will put all the names of your tests in a list, along with their pass and fail states:
py.test -v
This can be useful if you’re logging your tests for someone else to read. This will only control the state output, however. For the rest, see the next section!
Changing Defaults
Changing Traceback Printing
When a test fails, pytest will attempt to do a traceback to give you some information on what went wrong. And when I say “some”, I mean a lot… often too much. What if you could shorten that output, so that you didn’t have to scroll for pages to see the results of all your tests? Well, try this:
py.test --tb=short
Using –tb will change pytest’s traceback formatting to the format you specify. If “short” is still not short enough, you can do it one better:
py.test --tb=line
Or if you’re looking for something a little more familiar, you can set pytest to use the Python standard traceback formatting, like so:
py.test --tb=native
Invoke pdb On Failure
Oftentimes, when debugging a problem, you’ll stick the following statement on the line before the test failed to set a pdb breakpoint:
# code here
import pdb; pdb.set_trace()
# more code here
But why go through that hassle, when you can just do this when you run pytest?
py.test -x --pdb
This will invoke pdb immediately upon failing a test. Notice that I combined it with -x to stop pytest after the first failure. This combination is quite useful, as you don’t want to have to go through pdb for every single failing test.
Watching Files
All of these tricks will help you save time and energy while running tests. But all of them have one thing in common: you still have to head back into the command line and type them out. Well, we can take care of that, too. Enter pytest-xdist. This handy little package (in addition to other things) can keep an eye on your project files and re-run your tests every time it detects something has changed. Just install and run with the -f option:
pip install pytest-xdist
py.test -f
This will immediately run all of your tests, then sit and wait for any file to be changed. Even better, if any tests failed in the previous run, it will re-run ONLY those tests until they pass.
Alternatively, you can use a package called pytest-watch:
pip install pytest-watch
ptw
The downside to pytest-watch is that it’s a separate executable, and therefore you can’t use any of the tips in the rest of this article. On the other hand, it has some neat options, like configuring actions to occur on test failure. If you’re on OSX, try this out to have your computer actually vocalize how your tests are doing:
ptw --onpass=”say passed” --onfail=”say failed”
Final Thoughts
These are some of my favorite pytest options, but it’s really only the beginning. pytest has many options for reporting, collection, and debugging, and that’s not even getting into the rich assortment of plugins and packages to extend its capabilities. You’re going to be spending a lot of time running tests, so take the time to poke around and find the configuration that works best for you. It’ll be worth the investment!
Forking one of your own Github repositories ought to be easy, right? After all, forking somebody else’s repo is as simple as clicking a single button! Surely you can just press that same button on your own repo?
NOPE!
If you press the Fork button on your own repo, the page will refresh and… that’s it. No error message, no suggested course of action, nothing. It turns out forking your own repo on Github is impossible, but don’t worry: following the steps below will get you the next best thing.
1. Create a New Repo On Github
First, go to github.com and create a new repository. This will contain our fork when we’re done. I’ll refer to this repo as “fork-repo”, with the original being “orig-repo”.
Make sure you don’t check the box for “Initialize this repository with a README”. You’ll see why in Step 4!
2. Clone the New Repo Locally
Next, make a local copy of the blank repo we just made. In Terminal, cd to the base directory you want to keep the fork in and then type the following:
We’ll now add an upstream remote pointing at the original repo. This will allow us to pull files from the original repo, both now and in the future if we wish. Make sure you navigate to the directory you cloned the fork repo into first!
Now we can pull all the files from our original repo into the fork, like so:
git pull upstream master
Your fork directory should now be identical to your original repo!
Note that if you made a README.md for the new repo (or added any other file) you may have some merge conflicts to resolve before you can go to the next step. Make the necessary changes to your files and commit to resolve the conflict.
5. Push!
You’re done! Well, locally at least. All that’s left is to push your new fork repo back up to Github: