This post is part of an ongoing series recapping my experience in Oregon State University’s eCampus (online) post-baccalaureate Computer Science degree program. You can learn more about the program here.
Six-word summary: How the Internet Works: The Class
It’s an evenly-paced, heavy-workload class. It’s predictable (and the grading is sane), but it’s a lot of work and over half of your grade in the class comes from tests. When I think back to this class, I will remember the Canvas test interface. This class is quiz after quiz after quiz after quiz.
I’ve been in the OSU program since 2016, so I’m on the old “two electives” plan that treats CS372 as a required class. Going forward, though, I imagine most people reading this will be considering CS372 as an elective and wondering how it stacks up against other offerings.
CS372 Review
This class is just like CS271 (Assembly) in that it attempts to work you half to death in a subject that probably feels peripheral – if not completely unrelated – to your intended career path.
Every week feels exactly the same. There are about 1.5 hours of lectures to watch, a few book chapters to read, worksheets to do (if you want, they aren’t graded), a graded “summary exercise” you can take twice (they’re like quizzes in that they’re graded, but you get 6 hours to do them so they’re also open-book), and pick one or two of the following: a lab, a project, or a 90-minute quiz. That’s every single week from beginning to end.
You will study things like:
- How a bit gets from one machine to another (in excruciating detail)
- Calculate the realtime delays a packet will experience as it traverses a transmission medium
- Different networking protocols
- How things like TCP, UDP, HTTP, and email work
- How delayed a packet will be (in milliseconds!) if the network is such-and-such congested
- How wireless networking works
- How a packet gets packaged and split up as it makes its way across the mighty interwebs
- A brief glance at security-related topics
Networking as a topic is interesting and somewhat relevant to my web development interests but ultimately this class didn’t feel like it fed directly into my programming career or ambitions.
There’s very little programming in this class, and while I can imagine an interviewer or manager shrugging and saying, “Neat!” at the fact that I took a 10 week course in networking, I can’t imagine it’ll make or break my viability as a candidate for a programming job. (Just watch, now someone will ask me to label all the parts of a network-layer datagram header.)
Structurally, though, it’s a solid course – the workload was even, the grading was fair, and I walked away feeling like the class packed a lot of knowledge into my brain.
Class structure
- 10 weeks
- A weekly graded summary exercise of maybe 30 questions. You get two attempts, and they keep the higher score. There’s a 6 hour time limit but the most I ever spent was about 2.5 hours (and the fastest I ever got through one was about 45 minutes).
- A lab every 2 weeks
- 2 projects in which you program sockets using C or Java and Python
- Midterm, final, both proctored and closed book but you get to take a one-sided note sheet in with you (size 4 font worked nicely)
- There’s stuff due every week but it follows a consistent pattern
Time commitment
CS372 class was fairly time-consuming. Each week, I spent…
- 2 to 4 hours on lectures and worksheets
- 3 to 4 hours on the “weekly summaries” (6 hour graded quizzes), depending how many novel math problems were on them (this was worse in the first half of the quarter than it was in the latter half)
- 3 hours on any given lab, if there was one that week
- Anywhere from 6 to 10 hours on the current project, if there was one that week
- 90 minutes on the quiz, if there was one that week
- As many hours as I could afford studying for the midterm and the final in the 7 to 10 days leading up to the exam
Overall, I spent about 12 hours a week on this class. My children are in daycare 3 days a week to give me time to work on schoolwork, and I typically spent two of those days exclusively on this class’s material, plus some time in the evenings and the weekend if needed. The most time-intensive weeks were the ones that included a project. There were no “easy” weeks, and they don’t lighten the workload in anticipation of the midterm or final.
Compared to other classes, CS372 was a bit lighter than notoriously time-consuming classes such as CS162, CS261, and CS325. It was about on par with CS271 and CS361.
Lectures != worksheets != quizzes
Here’s my biggest gripe about this class, and the part where I try to help future students have a slightly easier time than I did.
The lectures lecture on one thing, the worksheets prompt you on another thing, and then the quizzes throw a bunch of math problems at you that weren’t really covered in the lectures or the worksheets. For many of them, you’re on your own to suss out the formula.
Worse, when you go Googling for help the top results are often for chegg.com, who will happily sell you the answers (eww) and old digital flashcards from previous students who posted answers but not how they actually solved the problems.

So, all that said, I thought I’d do something radical and document how to solve these problems for the benefit of anyone else taking this class.
How I solved…
- The VOIP problem (first seen in week 1)
- The routers-in-sequence problem (first seen in week 1)
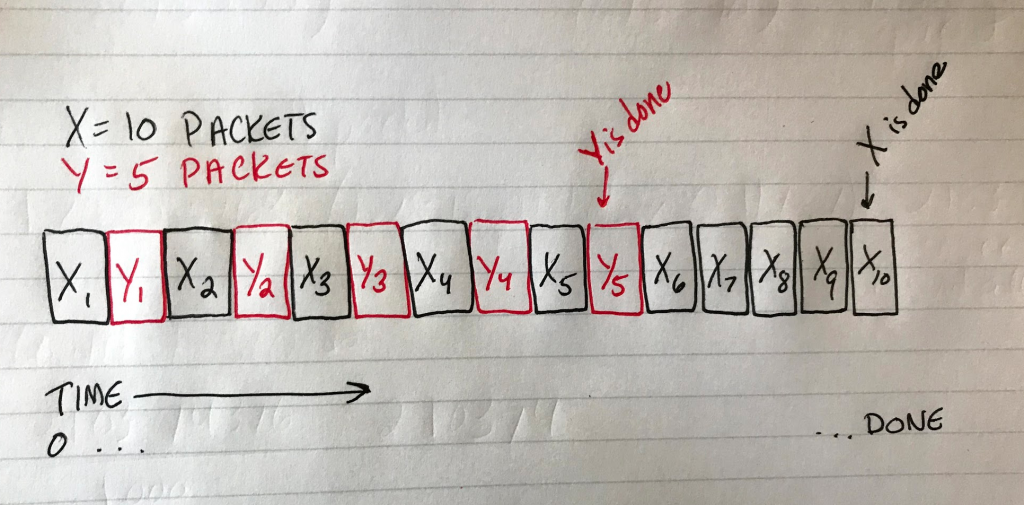
- The File X and File Y problem (first seen in week 2)
- The persistent vs. non-persistent HTTP problem (first seen in week 3)
- The “find the utilization for a TCP sender that is continuously sending” problem (first seen in week 5)
- The effective delay problem (first seen in week 6)
- The “mythical protocols” MSS problem (first seen in week 6)
- Finding the netmask, network address, host mask, etc. for a given IP address
Is it worth taking this class as an elective?
That’s the question everyone’s asking now as CS372 moves from being required coursework to an elective.
My short answer is no.
For me, there wasn’t enough practical problem-solving and programming in this course. The two socket programming projects are big and time-consuming, but they are dwarfed by the massive amounts of non-programming related work.
Some people may enjoy the theoretical nature of this class, but I prefer courses that teach skills and concepts I can immediately put to use on my software projects. I know there’s no “bad” knowledge, but I do feel like I spent 10 weeks studying something I will almost certainly never use.
OSU is rolling out a bunch of new electives in 2020 and beyond, and they all sound really exciting to me. (I’m graduating before I’ll have the chance to take them.)
Of the electives I have taken, I can easily recommend CS475 (Parallel Programming), and I will update this review with my opinion on CS492 (Mobile Dev) after I complete it next quarter (Winter 2020).
I really wanted to take CS493 (Cloud Application Development) but it requires CS372 as a pre-req and I’ll be graduating before Cloud runs again. Don’t be like me: many electives only run once or twice a year, so try to look ahead at least a full year so you can get into the electives you want. (I regret missing out on a chance to take Cloud.)
On the bright side, there’s no group work in CS372! So, if you’re sick of teammates who don’t produce anything and graded Canvas conversations, CS372 is a nice break from those sorts of things.
CS372’s Labs
This class alternates “labs” and “projects”. Labs are all about inspecting packets in a program called Wireshark, and projects are programming in a mix of C/Java and Python. (More on Projects in the next section).
There were 5 labs total and each one took about 3-4 hours apiece.
You can run the “trace” yourself, or you can use the downloaded trace from the author’s computer. I highly recommend using the downloaded trace. My own traces were polluted with tons of noise from my home network and I found that things were often “different” in one way or another. I wanted to just slice through labs like a hot knife through butter, and the easiest way to do what was using the provided trace data.
Each lab is 15-20 questions and you produce a pdf document that includes screenshots from Wireshark justifying your answer for each question. Overall, these were straightforward and manageable.
PS: I couldn’t get Wireshark to run on my Macbook so I had to use my Windows PC for the labs. Just a heads up for anyone else on a Mac. (And it’s well within the realm of possibility that the problem was unique to my machine or could have been solved with more effort.)
CS372’s Projects
There were two socket-programming projects in this class, and they were both challenging and time-consuming.
I felt like both of the projects were the most difficult part of the class. The rest of the class’s material is memorizing definitions and stepping through a series of steps to solve a math problem.
If you can, take CS344 first. The socket programming project in that class offers more hand-holding and provides some code you can adapt to CS372’s projects. (CS 372 students are directed to Beej’s Guide for help, but I didn’t find the guide useful at all. It’s long-winded, the examples are difficult to adapt to the project’s needs, and the attempts at humor are lame and eat up valuable screen real estate.)
I spent about 15 hours on Project 1 and about 30 hours on Project 2. Definitely start early on the projects and work in small, incremental steps. The times when I got mired were when I tried to do too much at once.
To the class’s credit, they provide a detailed rubric to test against. This was extremely helpful and something I wish all OSU CS classes would do.
Pro tip: The second project is meant to be a “portfolio piece”, meaning you can share your project code publicly once grading is over. Many students have done exactly this on GitHub. Part of being a software engineer is reading and understanding code you didn’t write, so there is value in looking up what others have done and stepping through it yourself until you comprehend it. My heartfelt thanks goes out to the past students who posted their Project 2 work publicly – I don’t think I could’ve gotten through the file transfer/sockets project without a few examples to study.
CS 372 Exams
Both the midterm and the final are proctored.
They are similar in structure to the weekly “summary exercises”, so taking the practice versions of those (look in the “Grades” section in Canvas and scroll all the way down for the ungraded practice versions) is time well spent. Expect a few novel problems that you’ve never seen before (those are definitely where I lost my points, some of the questions were unlike anything I’d studied).
My strategy (and I think this was a good one, as I walked away from this class with a solid A) was to score 100% or near it on every weekly summary, lab, project, etc. to make some room for mistakes on the tests.
Overall, I felt the tests were fair and that the materials provided were adequate preparation.
Final tips for CS 372
Get a good weekly routine going. The workload is extremely consistent (and rather heavy) so a consistent pattern will serve you well. Mine was something like…
- Sunday and Monday were lectures and worksheets
- Tuesday was the first attempt at the weekly summary and starting the lab or project assigned that week
- Wednesday was all lab/project and the second attempt at the weekly summary
- Friday was all lab and project
- Saturday was anything that was left (I rarely needed Saturday, with the exception of Project 2, which totally dominated my life until it was over)
Get proficient (and fast) at solving the kinds of problems you encounter on the weekly summary exercises and you’ll be 80% of your way to a good grade on the exams.
Right before the midterm and the final, go back and practice the stuff you did a few weeks ago (preferably on a whiteboard or scratch paper like you’ll have in the exam). I was surprised at how rusty I got at problems I was solving with ease just a few weeks ago. You really want to be a well-oiled machine at solving the math problems come exam time.

Don’t be afraid to go straight to teh Googlez for help. The projects in this class basically leave you on your own, and the fastest and best way (imo) is to start Googling. You’ll do that at work someday, anyway.
Onwards to Winter 2020! I’ll be taking CS 492 Mobile next quarter, followed by Capstone in the spring.