The site is not huge or complicated, so I started digging…
(Side note: it wasn’t the unused media and it wasn’t trashing all the comments, though deleting them did feel amazing and I highly recommend it)
The culprit: hundreds of tags
WordPress makes it easy to edit and remove Tags – just navigate to Posts on the left and open the Tags section. This slow-to-publish site had a good 250+ tags, most of which were in use by either 0 or 1 post, and almost all of which weren’t even useful (the me of 2014 who made all those tags was just doing her best).
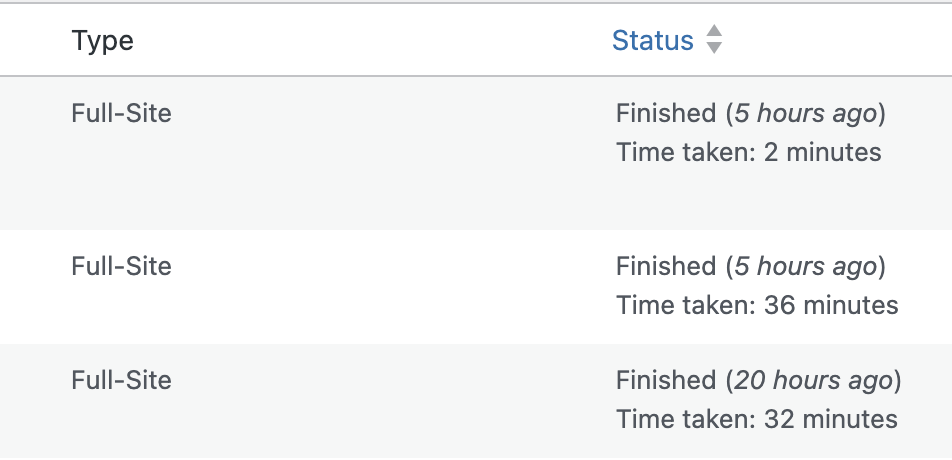
I deleted the vast majority of the tags, and now the site exports in ~2 minutes.
TL;DR: delete all your excess WP tags and Staatic might publish faster
In this article: How I moved several of my WordPress blogs from shared hosting to Netlify as static sites. Article was written June 2024 and minorly updated in February 2026.
I have a collection of WordPress blogs dating 10+ years back. They are all on a shared host who keeps raising the cost to renew. The sites are old and they don’t get many visitors, but rather than take them down I decided to turn them into static sites that are simpler to maintain and less expensive to host.
It is not a difficult process, and I documented all the hiccups I encountered along the way in this guide.
Pre-reqs
You have:
WordPress site hosted on shared hosting (like Bluehost, Siteground, etc.)
Your own domain (optional, but this guide assumes you do)
About 2 hours of time
You want:
Less expensive hosting (Netlify has a free tier that can handle small static sites)
A faster, simpler, and more secure live WordPress site
You can tolerate:
A new workflow for your WordPress site – you will run your site from your own computer, make edits on that version, and then “publish” a static version of your site to Netlify
A simpler “live” version of your site – you can’t have any kind of user interaction like user accounts, comments, or shopping carts
Some debugging – none of my sites came over with 0 problems
Step 1: Export your WordPress site as a .zip
Log into your WordPress site, install the “WP Migrate Lite” plugin, and export your site. The purpose of this step is to create a .zip file containing everything needed to run your site locally (on your computer).
There are a number of options in this plugin’s config.
I use:
Database – leave as defaults
Media uploads – take all
Themes – export just the ones I use
Plugins – export all
Must-use plugins – export all
Other files – export all
WordPress Core Files – yes, all
Click the “Export” button and wait for it to generate a .zip file. Hopefully it works. If it does not, you may need to adjust what you export or do the old WordPress standard of turning off plugins one by one until it works.
You should leave your actual site up and running. (In fact, your original site can stay up through this entire process.)
Step 2: Import your WordPress site to Local
I use Local to run my sites on my own computer, and Local has versions for Windows, various flavors of Linux, and Intel and Apple Silicon Mac so hopefully it works for you, too. It’s free.
Click the “+” button to import your site.
Import the .zip file you downloaded in Step 1.
For me, going with the “Custom” environment that it autofills for me has worked so far.
Fix the SSL certificate
The site won’t fully “work” until you approve its SSL certificate. The main page might load but images won’t and you’ll have an annoying banner across the top like so.
Sometimes I get a message about flushing the cache, which I do with wp cache flush.
Now I go back to Local and open the site adminpage. If you get a security error, try opening the page via the WP Admin button.
I don’t know why, but Local never seems to know that my site is secure (and it keeps serving me the insecure version) until I actually log in as my admin account. Sometimes it still doesn’t work, so I go back and trust the certificate again. Some combination of restarting the site, trusting the certificate, and logging in as admin eventually gets it all working.
Do not leave this step until you have clicked around your .local site and verified images and links are working and the URL is the secure version.
Step 3: Get Netlify ready to receive your site
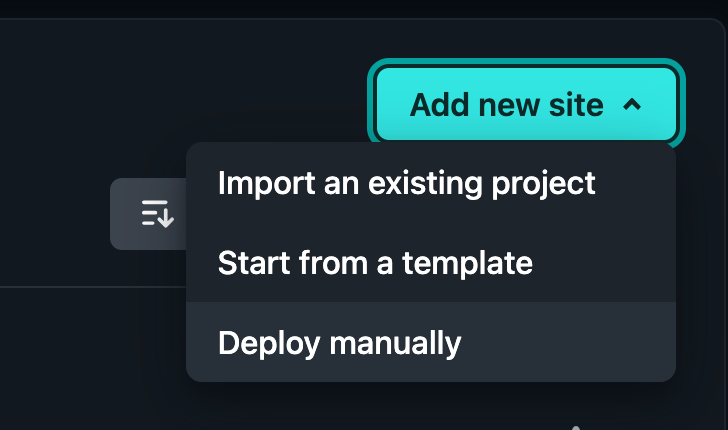
If you haven’t, head over to netlify.com and create an account. Look for “Add new site” and choose “Deploy manually”.
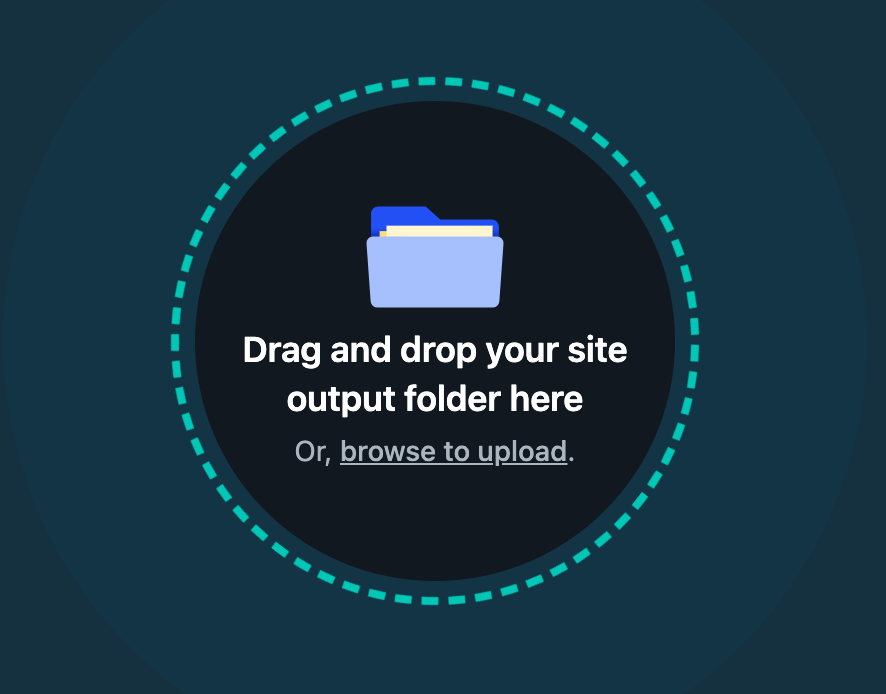
This step assumes you have something to upload, and you’ll be stuck here until you give it something.
Just feed it something simple – I upload a folder (name doesn’t matter) containing index.html (name and extension do matter).
Now you have a Netlify site!
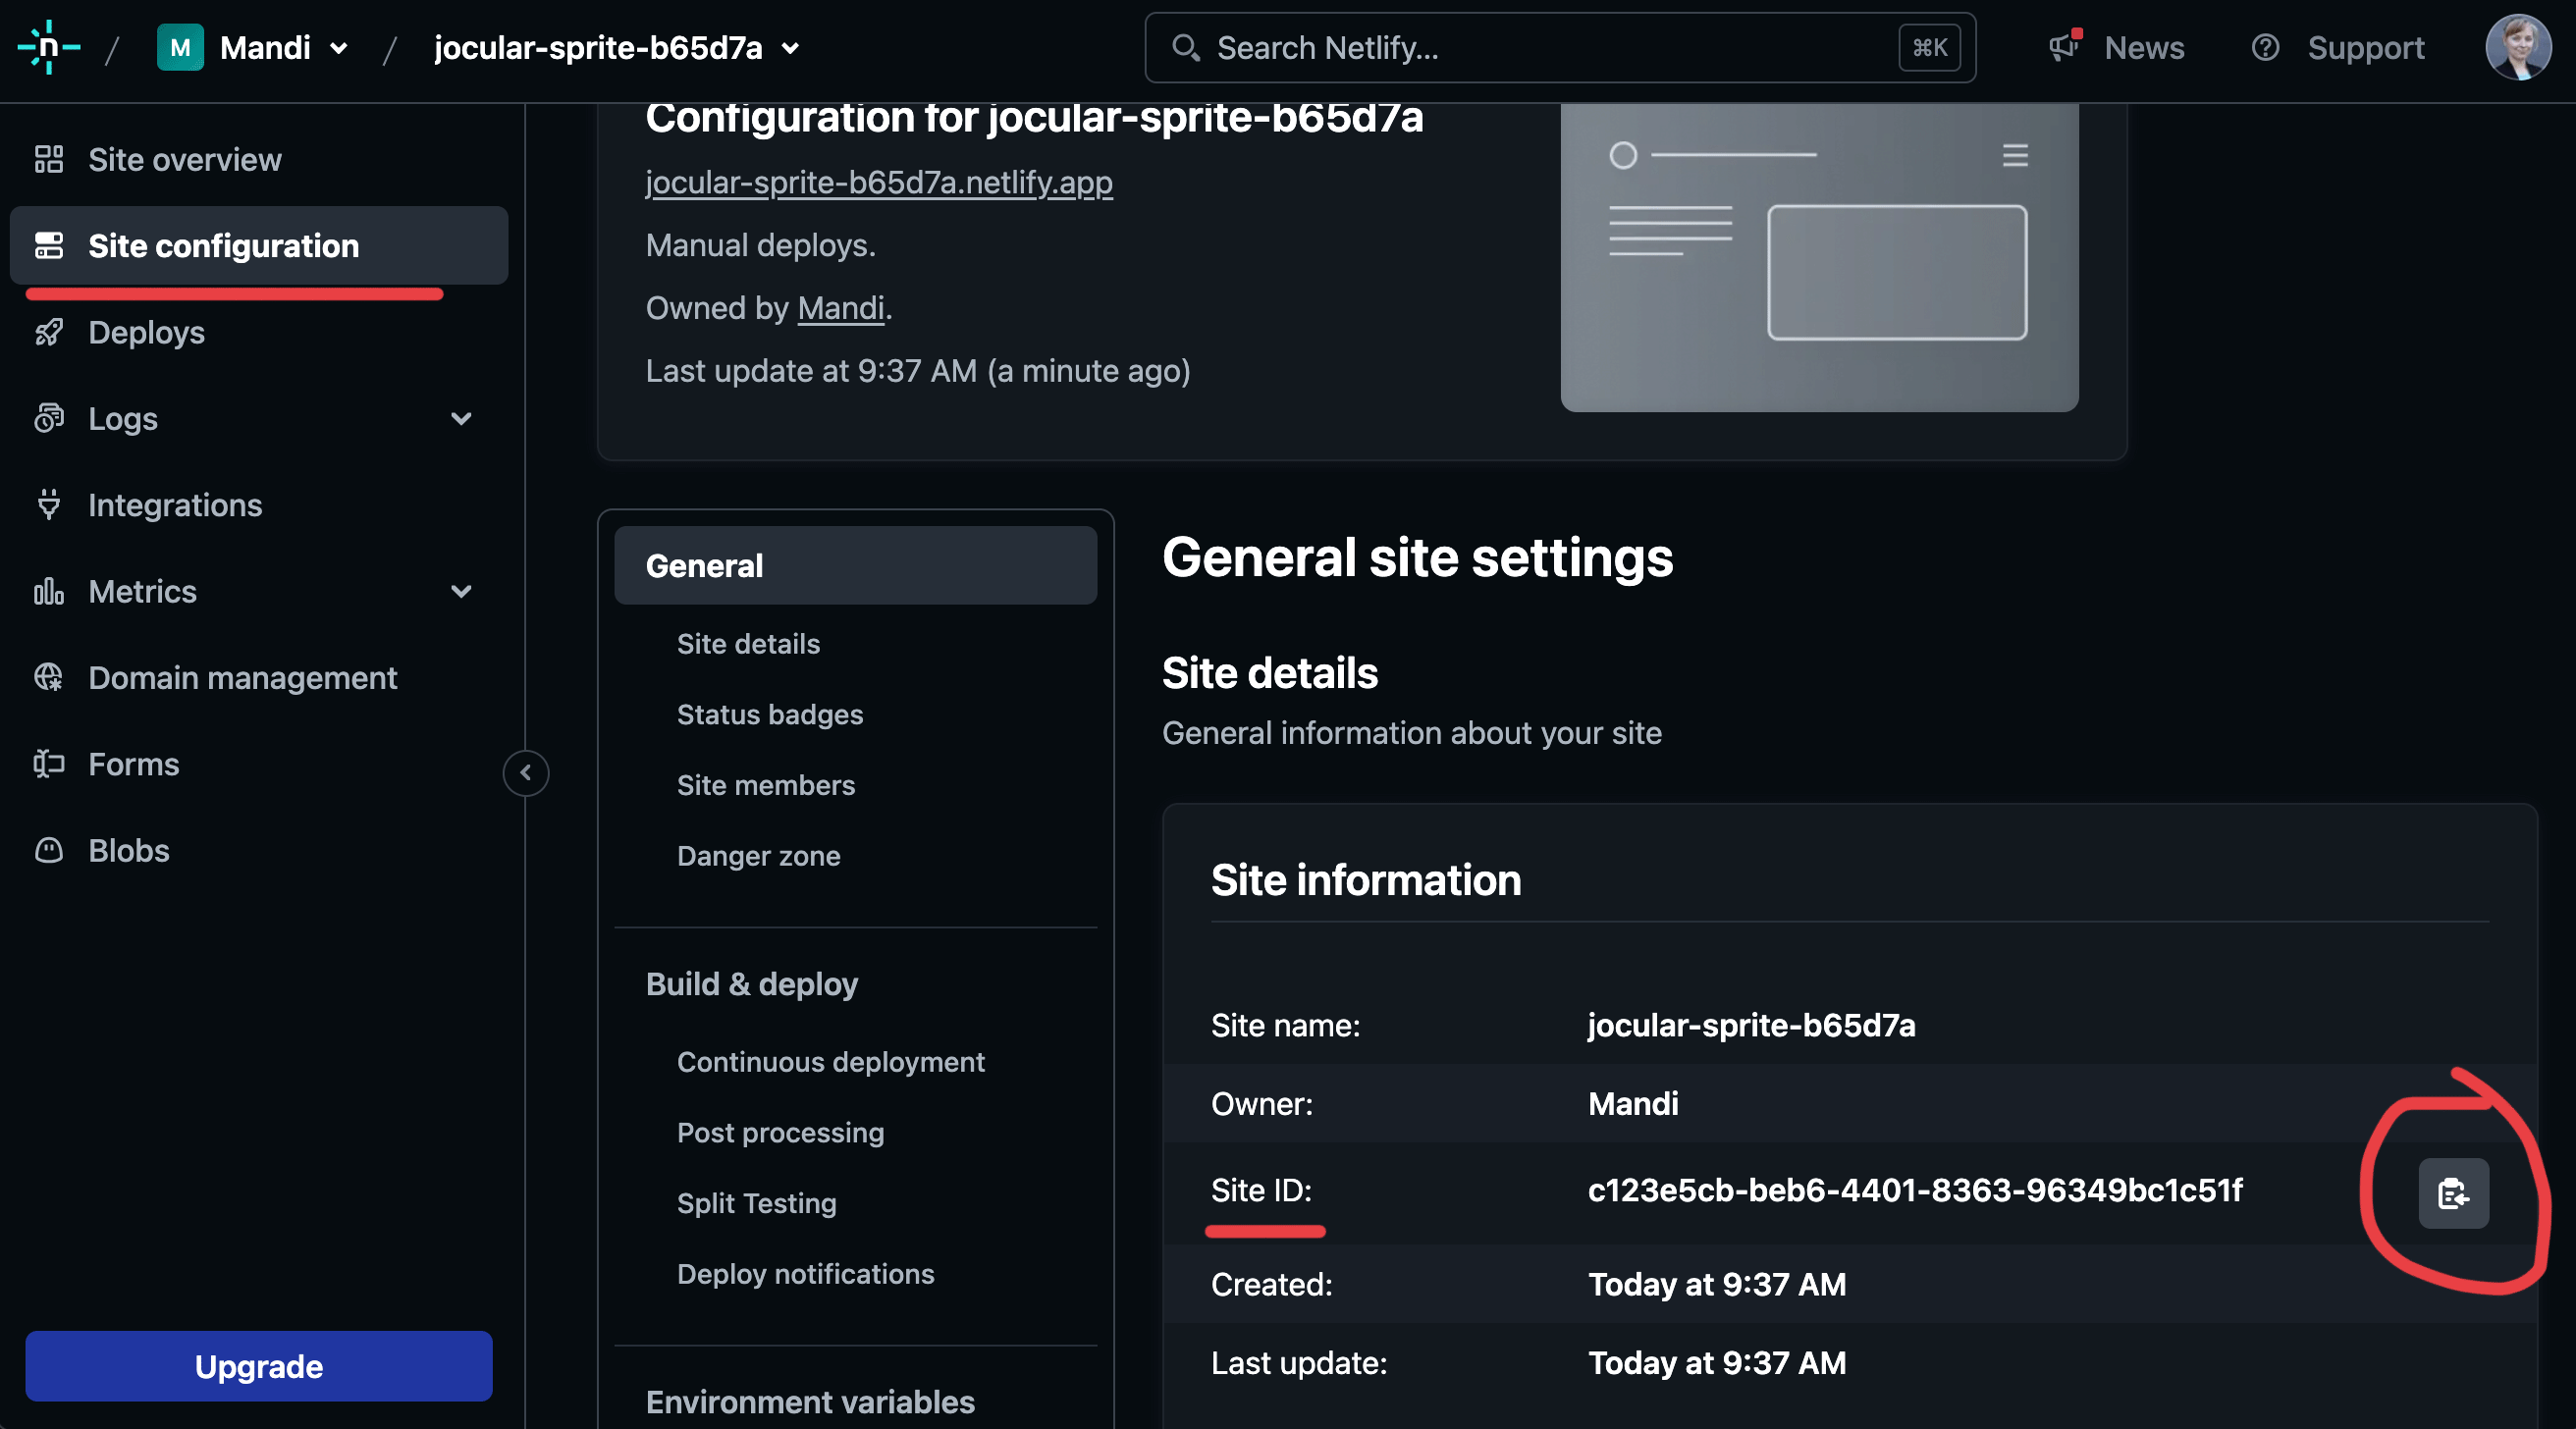
Go to “Site configuration” (on the left) and copy the “Site ID” somewhere.
You will also need your Netlify OAuth token, which is created by going into your own personal settings in Netlify.
Copy this string somewhere safe, too.
You should now have:
a site ID
an OAuth acess token
Step 4: Publish your site using Staatic
Go back to Local, load up yoursite.local, and install the Staatic plugin. Once installed and activated, open the Deployment tab and fill in your Netlify Access Token and Netlify Site ID (and don’t mix them up). Save changes.
Go to Staatic -> Publications and attempt to publish to Netlify.
The publish step is, unfortunately, where I usually spend most of my time.
This one’s easy – go into Staatic’s advanced tab and check the “Downgrade HTTPS to HTTP while crawling site” checkbox.
cURL error 28
"Crawling entry URL 'https://yoursite.local' failed: cURL error 28: Operation timed out after 60002 milliseconds with 0 bytes received (see https://curl.haxx.se/libcurl/c/libcurl-errors.html) for http://yoursite.local/
I usually get rid of this one by disabling all the plugins I won’t need once it’s a static site, such as Akismet and W3 Total Cache (and similar). I haven’t bothered to narrow it down further (and it may be multiple plugins causing it) but it’s probably whichever plugin(s) prevent a robot from crawling a site.
Another solution if you’ve already tried the above: restart the site in Local and try again.
“Too many redirects” on Netlify after deploying
One of my sites gave me a lot of trouble: the publish was a success, the deploy appeared to be a success, but visiting the deployed page on Netlify gave me this “ERR_TOO_MANY_REDIRECTS” page.
Reader, I spent hours on this problem. It wasn’t any of these things:
❌ uninstalling W3 Cache and other plugins ❌ reinstalling the Staatic plugin ❌ cleaning up all the URLs that were creating a redirect entry in the Resources tab
And there’s some evidence of it here in the Publication’s own “Resources” tab – where is it coming from? What is it??
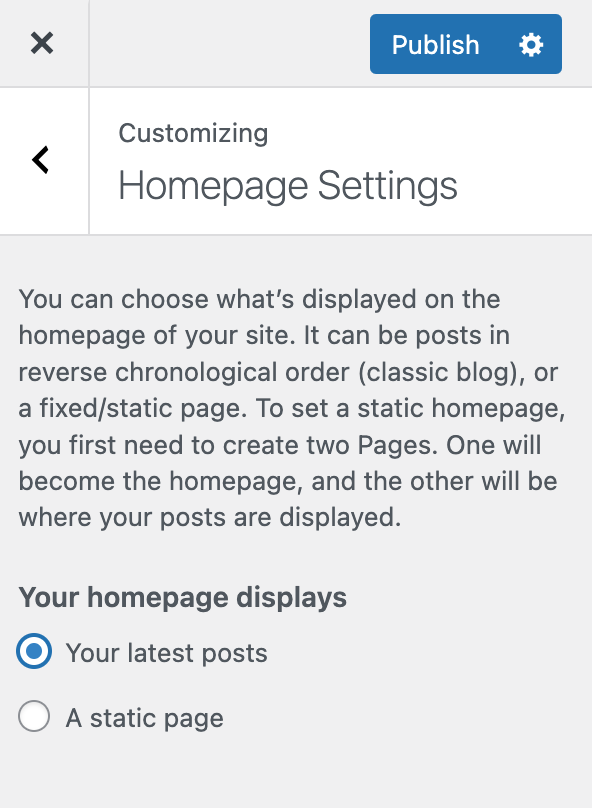
✅ I fixed it by going into WordPress’s Customize page menu and making my homepage NOT a static page. Choose “your latest posts” and publish again.
I honestly think this is a bug with Staatic. ????
If your WordPress site is using a Page as its homepage, Staatic inserts a redirect from “/” to “/” into the netlify.toml file like this:
[[redirects]]
  from = "/"
  to = "/"
  status = 301
  force = true
This redirect is not present if you choose “Latest posts” for your homepage. A website published with “Latest posts” also does not include that weird redirect in the Publication’s “Resources” tab.
I only discovered this because I had the idea to download the entire site from Netlify (it’s in their UI somewhere), remove the from = “/” to = “/” redirect, reupload, and see if the site looked any different. It did – I could see my site! But instead of my homepage, I had this embedded 404.
That gave me the idea to adjust the content of my homepage, which WordPress surfaces in Appearance -> Customize -> Homepage Settings. I spent some time toggling between “Static Page” and “Latest Posts”, publishing, and observing the .toml file each time.
TL;DR – Using a static page for your homepage will cause Staatic to insert an endless redirect. If you have a redirect loop on your static WordPress site, try it with “latest posts” as your homepage instead.
I guess that’s what you get from a free plugin. (Hope this helps someone)
Crawl succeeds but publish takes forever
Try it again without changing anything – I swear that fixes it 90% of the time.
For the rest of the times it takes forever to publish, go to the Staatic Settings page and look in the Advanced tab.
Logging: if you have it on Extensive, try Detailed or lower
Find all the Timeout values and double them
(don’t forget to save)
Step 5: Change your domain’s nameservers
This section updated January 2026.
In this step we are going to make yoursite.com point at your Netlify deploy.
Confirm that you are happy with what’s been deployed to https://yoursite.netlify.app because this step will hook your domain up to the Netlify deploy and start sending visitors to your static site.
Compared to what came before, this step is easy.
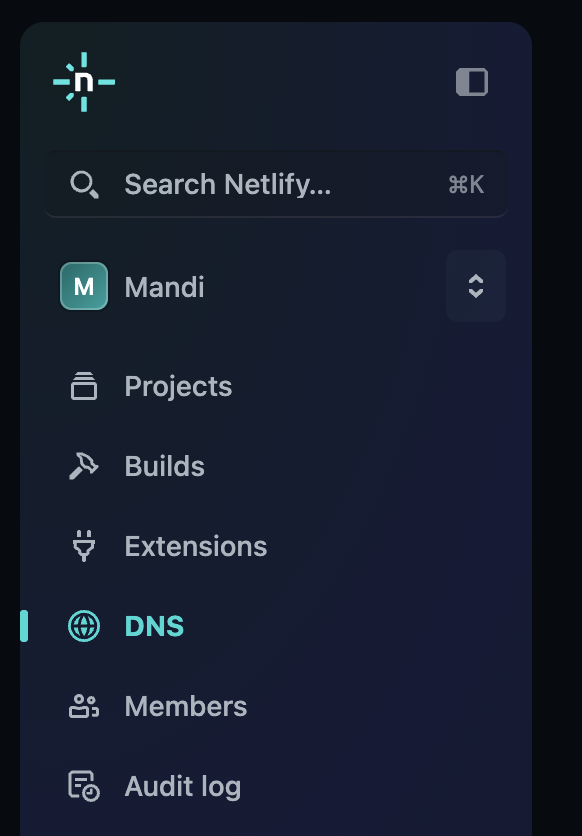
In Netlify, click “DNS” in the side panel.
On the right, click “Use Netlify DNS”
I already own the domain I want to use, so I enter it here and click “Verify”:
Now it gives me the nameservers to use, which I go over to Dynadot (my registrar) and apply.
Return to the project and add it as a production domain (come to think of it, we probably could’ve just added the domain from here instead of going in through “DNS” on the left)
In any case, it should now be available to add through this menu and you should soon see “Netlify DNS propagating”
Step 6: Wait for DNS and add a Let’s Encrypt! certificate
In my experience it takes about 10 minutes for the domain change to propagate. When it’s ready, add a security certificate. (Bottom of the “Domain management” section).
Here’s what success looks like – if it fails, it might be that the propagation hasn’t finished yet.
You’re done with this step when it looks like this. (If it’s been 10+ mins you might have to just reload the Netlify page)
Confirm your site looks good at yoursite.com and then deactivate the version hosted on your prior host (and then check it again for good measure before you delete anything).
Step 7: Other things you might want to do (or know about)
Google Search Console: Since you moved hosts, you will probably have to redo your verification with Google Search Console.
Log into Search Console, and add or update your site. Get the TXT code and add it to your site in Netlify as a DNS record of type “TXT”.
Backups: Your static site can’t run an automated backup plugin, so you’ll want to do it yourself from your local machine. I use Updraft and I publish the backups to Google Drive. Since the blogs I turned into static sites don’t get updated very often (if at all), I don’t mind running the backup manually after I make a change.
All your plugins and your WordPress install are no longer going to automatically updateon their own. Your static site is like a “render” or an “export” – it doesn’t have all the plugins running 24/7 doing automated backups. You’ll have to open Local, run your site, and update plugins/WP yourself.
Next up: adding the Image Upload / Select feature to the plugin. When the user creates a new Product Box, they should be able to pick an image for it (not just paste in a URL, that’s too janky for this fancy plugin). Furthermore, the user also needs to be able to edit that image choice when editing an existing Product Box.
WordPress already has a media management page/popup.
That’s this thing:
Adding WordPress’s built-in Media Uploader to my plugin was quick and painless.
I just needed to hook into this feature from my plugin’s page. I used this tutorial as a starting point.
I didn’t use quite the same structure as this tutorial recommends. I wanted all of my form HTML in the same view files, not echoed in by a php function elsewhere in the codebase, but I did need to add an admin.js file and enqueue it as shown here, in my ‘init’ action. The tutorial left this step out so I’ve included it here:
The images are stored in my post content object by their ID (look at the very end – “215” is the image’s ID).
{"productName":"The Rainbow","productTagline":"It\'s got all the colors of the spectrum","productDescription":"Lorem ipsum dolor sit amet, consectetur adipiscing elit. Fusce pulvinar, leo at cursus finibus, lectus massa tincidunt nulla, vitae lobortis lectus orci vitae nunc. Aenean a elit mollis, iaculis felis sed, consectetur velit. ","productUrl":"http://wow.com","productButtonText":"See the rainbow on Amazon.com","productImage":"215"}
I used wp_get_attachment_url() to turn the ID into the full path to the image. This is how it looks in the html that renders the actual product box in the post:
Here’s my New Product Box page as the user first sees it:
And here’s my Edit Product Box page displaying an image the user already chose for a product box:
And here it is in a post!
Smaller images are centered; larger ones fill the frame as shown in this screenshot. Huge ones are stopped from overflowing the box and get scaled to fit. For pleasing results, square images are recommended.
This merged pull request shows the complete image uploading code (plus some bonus CSS styling and tagging to make it all look a bit better).
Day 10: Making the plugin’s settings page
I thought it’d be cool if all the product boxes shared a “headline” phrase, such as “We recommend” or “Our choice”. The user should edit in one place instead of on a per-box basis (though maybe a per-box override could be added, too, in the future).
WordPress calls this sort of thing an “option” and makes it very easy to set/get them. (This tutorial was helpful for identifying which hooks to use.)
Unlike everything else so far, the settings are not saved as posts. They’re saved as options in the _options table. Since all plugins (and WordPress itself) saves their plugins here, it’s important that the option have a unique name. Here’s my new option along with the string I gave it:
I wanted my plugin options to be adjustable from the plugin page (rather than a separate settings/options page elsewhere in the dashboard like some plugins do) so I simply added another form below the list table:
Here’s the form HTML (you can find this in view/product-box-list.php)
And finally, I modified the HTML that displays the actual in-post product box to echo out the setting value instead of a hard-coded string (also in amazin-product-box-plugin.php):
[Bug fixes and improvements] Adding a welcome banner, hiding search, completing the shortcode display, and fixing “sort by name”
Before moving onto a new feature I took a moment to make a few more improvements. There is now a “Welcome” banner at the top of the plugin page, the shortcodes now display in full for each table row, I hid the search bar, and I fixed sorting by name (it used to not work at all because it was trying to run the query on ‘name’ instead of ‘post_title’).
First, I read the official guide on deactivating vs. uninstalling plugins. I figured if there was one place I really didn’t want to just fly blind, this was it.
My uninstall script needed to do the following:
Delete the custom posts of type “amazin_product_box” from the _posts table
Delete the plugin’s setting (“amazin_product_box_option_headline”) from _options
I went the route of making a standalone .php script. The example from WordPress’s developer guide shows dropping a table but that’s a bit extreme for my use, I just needed to delete the posts of type “amazin_product_box”.
Here’s what I did (it’s basically the example from WP’s own site with my own plugin’s names for things instead):
uninstall.php
<?php
// if uninstall.php is not called by WordPress, die
if (!defined('WP_UNINSTALL_PLUGIN')) {
    die;
}

$option_name = 'amazin_product_box_option_headline';

delete_option($option_name);

// for site options in Multisite
delete_site_option($option_name);

// drop a custom database table
global $wpdb;
$wpdb->query("DELETE FROM {$wpdb->prefix}posts WHERE post_type='amazin_product_box'");
?>
With the uninstall script in place, I was able to deactivate and uninstall my plugin. I verified that the custom posts were gone from the _posts database and the headline option was gone from _options and from WordPress’s plugins directory on my server. Everything looked good.
The shortcode gets left behind in the posts, but I don’t think there’s anything I can do about that:
Finally, I reinstalled my plugin. None of the previously-created product boxes were present, which I expected since they were gone from the db, and I was able to create a brand new product box and stick it in a post.
Sweet – back in business.
Phew. I was dreading this part but the uninstall feature turned out to be the easiest, most “got it right on the first try” step of the whole project.
Day 12: Testing, bug fixes, and trying it out on a real website
The last thing I did was install the plugin on one of my actual sites and try it out as if I were an actual user.
I found a few bugs (including one that made the button not actually go anywhere, yikes) and had a few ideas for improving it, so I spent this last day on fixing those things.
[Bug fix] – Editing a product box with an existing image now retains the existing saved image
[Improvement] – Image upload help text added to Edit and New forms
[Improvement] – Added a “plugin action link” that goes directly to Amazin’ Product Box management page via the plugin’s entry in the plugins page
[Bug fix] – Button actually goes to the user’s link now
[Improvement] – Added a setting for whether the button should open the link in a new tab or stay in the same tab
[Improvement] – Product Box is now narrower than the post (I think it looks nicer that way)
Here it is: my first WordPress plugin, just over 2 weeks after I started the project – looking exactly how I’d hoped.
I started blogging about product photography (and later smart home technology) ~5 years ago. I wanted to make my own custom plugins but I was just a baby programmer at the time and I got overwhelmed by terminology and just generally having no clue how to put something like it together.
Even now, after having worked professionally as a full-stack web dev for a few years and having completed most of a computer science degree, I was still a little intimidated by this project. Working in something new is always a bit uncomfortable at first.
Fortunately, this project wasn’t nearly as hard as I’d feared, and while I’m sure there’s something I got wrong with my first attempt at a plugin, I was only a little bit scared to deploy it on one of my live sites. :D
If you read this entire dev journal, thanks for following along – and if you see anything I could’ve done better, don’t hesitate to leave a comment or create a pull request on the project repo.
Resources
For future reference, here are some guides I found helpful for WP plugin development:
Now it’s time to render the Product Box in a post and give it some attractive styling.
Day 6: Embedding the Product Box in a post using a Shortcode
With the management page built (or at least built enough), the next thing I wanted to do was see a product box in a post. I knew I wanted to do this with a WordPress shortcode, so I started by reading the Shortcode API and a Shortcode tutorial and used it to whip up the most basic Shortcode-driven bit of code in the history of WP plugins:
function amazin_product_box_shortcode( $atts ) {
    $a = shortcode_atts( array(
        'id' => 'id'
        ), $atts );
    return "Hello from Amazin Product Box for post ID " . $a['id'] . '!';
}
add_shortcode( 'amazin-product-box', 'amazin_product_box_shortcode' );
I have the new Gutenberg (blocks) version of WP so I used the “Shortcode” block to put my plugin’s Shortcode into the post:
And here it is in the published post! (It’s the last line, the one that begins with “Hello”.)
Sweet – it’s in the post!
The next step was to make it HTML, not just a string. I encountered a few problems along the way, so I documented them and their fixes here to help explain the code a bit better.
Problem: Plugin HTML output appeared at start of post
Tying up a few loose ends: classes on the HTML tags, Shortcodes in the management table
In preparation for styling the box, I added classes to all the HTML elements. The plugin will have some default styles, but will also expose the CSS for the user to edit to their liking (and save it somewhere).
I also went back to the admin page and made it so Shortcodes display here without rendering as product boxes inside the table. That commit is here.
Day 7: Styling the Product Box
The next thing I did was add a stylesheet to the project, enqueue it, and add a bunch of styles to make the default Product Box look better. Here it is in my post, now styled:
I also added the “We Recommend” text at the top, which is hard-coded for now but will ultimately be something the user can edit in the plugin’s settings (so that the user only has to change it in one place if they want it to say something different, like “Our Pick”, or hide it entirely) and fixed a problem with loading the posts for editing (it was the same “NULL fix” I used for displaying them in the post).
I considered letting the user modify the Amazin’ Product Box’s CSS via the plugin, but realized that 1. this would be a ton of work to develop, debug, and support, likely involving sanitizing the user’s CSS input and saving it to a file in the plugin directory, retrieving it, using it (or parts of it) based on the user’s settings and 2. this functionality is basically already present in WordPress’s own Appearance > Customize tab.
As a test, I restyled the button using WP’s custom CSS area. Anyone who wants to change the look of an Amazin’ Product Box should be able to safely do so via their theme or child theme or WP’s Customize using this same technique.
In this series: watch me code a WordPress plugin from scratch. I’ve never made a WordPress plugin before but I did a bootcamp half a decade ago and I’m good at Googling and trying things until it works, so I’m sure I’ll figure it out.
This began innocently enough. I wanted a thing, so I did what any self-respecting developer would do and spent 5x as long making it myself as it would’ve cost me to simply buy someone else’s solution. (On the bright side, I got exactly what I wanted.)
Here’s my finished product. It’s a “product box” that the user creates, manages, edits from a backend and displays in a post using a shortcode. The idea is to call attention to recommended products and capture affiliate revenue from the button (link) click.
The next 4 posts (and 6000+ words) are my “dev journal” that I added to every time I worked on it. You can follow along and watch me go from plugin newbie to finishing my first plugin and deploying it on a live site.
PS: This first post is by far the longest of the series.
Day 1: Making a plan, setting up a GitHub repo, and getting started
First, I captured the requirements for this plugin. It seemed like a small project but I still like to bang out a page of requirements first so I have something to refer back to and can (hopefully) catch things I didn’t think about when I was all excited about the fun parts of the new idea.
Behold, my simple mockup:
I made this in wireframe.cc. Paper or a drawing in some sand would’ve also been fine.
This simple mockup revealed a lot of requirements:
a way for the user to input a title
a tagline
a short blurb
an affiliate URL for the button to use
an image
maybe I want to let them customize the colors of the button and the text, too
a way to insert it into the post with a shortcode (might look something like [amazin-wp-box id=1])
a way to manage and edit existing Amazin’ product boxes
I collected all of this in a Google Doc that will serve as this project’s documentation and idea repository. No matter how small the project seems at first, it always seems bigger once I start writing down every little thing it needs.
Make a github repo for this project
I usually start projects off with a new GitHub repo. It’s just a good practice and it takes like 2 seconds to make a repo and I sleep better at night knowing my work is backed up offsite.
New github repo. I made it public so everyone can see my process (for better or worse).
And then I cloned it locally and cd’d into it.
Boilerplate plugin coding: getting started by adding a button to the admin menu
I’ve never made a WP plugin before but I’m know a ton of other people have and, if I’m lucky, a few of them have documented the process.
<?php
/**
 * Plugin Name: Amazin' Product Box
 * Plugin URI: http://majoh.dev
 * Description: Customizable product box for Amazon products with an affiliate link
 * Version: 1.0
 * Author: Mandi Grant
 * Author URI: http://majoh.dev
 */
..and uploading it to my site’s plugins directory like so:
I took a domain I wasn’t using for anything, hooked it up to my shared hosting account, and spun up a new WordPress installation on it.
Hey, look, here it is in my site’s plugins! I AM NOW A PLUGIN DEVELOPER
(I’m kidding about the being a plugin developer thing, this is literally all it does so far.)
The next thing I wanted to do was make the plugin have a “page” of its own where the user can add product boxes, delete them, edit them, etc.
That meant:
Adding a “button” (or maybe “link” is a better term for it) to the plugin’s page on the admin_menu (that’s the toolbar down the left side of the WordPress interface)
Make the plugin admin page load and display something so I know it loaded
Mostly this was a lot of trial and error. I didn’t know what WordPress calls that menu down the left, I didn’t know what hook to use, and the Internet is bursting with outdated WordPress tutorials.
It took some Googling to figure out what this was called and how to “hook” into it. Ultimately, I found my answers in the WP Codex and ended up with this:
Amazin’ Product Box now has a button in the admin menu and some placeholder text I wrote in the page itself.
The next thing I wanted was a management page for my plugin. I went back to my Google Doc and mocked up a quick layout for the management page. Now I have a spec to code to. ;)
Quick text-based mockup of the management page. I’m sure it’ll change as I develop it, but this helps me envision it as I’m coding it.
Building the management page wireframe (just the HTML)
I knew I’d need a form and a table, so I built the HTML portion first. This part was easy, just an HTML form with some inputs.
“Use the existing database tables instead of creating new custom tables if possible. Most use-cases can be accomplished with custom post types and metadata, custom taxonomy and/or one of the other standard tables and using the standard tables provides a lot of UI and other functionality “for free.” Think very carefully before adding a table because it adds complexity to your plugin that many users and site builders prefer to avoid.”
Okay – sounds like I shouldn’t make a new table just for these things. I looked at how TablePress saves its tables, since that plugin works (in some ways) like how I want mine to work.
As it turns out, TablePress saves its tables as posts. Neat.
I can see how I might do the same: product title could be saved as post title, but what about tagline and the affiliate link? I then did some reading on custom post types and considered a custom post type that had all the fields I needed, but I also realized I probably didn’t need a custom post type and I could potentially just serialize the product box data into an array and pull it out for display, thus making the normal post type fine.
Or, I could use custom fields on a normal post. For now, I decided to go with the normal post type and see if I can get a bare-minimum implementation going with just the normal post type. So that’s what I decided on: I’ll ahve it save the form data to the db as a normal post.
That was easy enough: I made the form call a function like so:
And stuck a bunch of placeholder values in the function itself:
function post_new_product_box() {
    $my_post = array(
        'post_title'    => 'Test product box',
        'post_content'  => 'Test description',
        'post_status'   => 'publish',
        'post_author'   => 1,
        'post_category' => array( 8,39 )
    );

    // Insert the post into the database.
    wp_insert_post( $my_post );
}
This works – sort of. The new post is in the db, but it also shows up with my regular posts in the Posts section of my blog’s dashboard. (It also shows up twice. Maybe I double clicked the submit button.)
Here’s the commit – I wouldn’t get too excited about it, though. It’s buggy and doesn’t use the form data yet.
Getting the form data from the HTML form, into the php method, and into WordPress’s MySQL database
The next thing I did was start reading on how to get data from the form. This was also about the time I realized that there was a non-zero chance I was doing this all wrong and probably introducing a huge security hole.
But for now, I just want to see form data make it to the database (I can secure it later).
(I’m going to spare you my dozen or so trial and error steps here, such as the “step” where I realized I had a typo in “name” on all of the form inputs and the “steps” where I experimented with different ways to serialize the data.)
I ultimately settled on this way of capturing the form data and encoding it for the database.
function post_new_product_box() {
    if ( isset( $_POST['submit'] ) ) {
        // retrieve the form data by using the element's name attributes
        // value as key $firstname = $_GET['firstname']; $lastname = $_GET['lastname'];
        // display the results echo '<h3>Form GET Method</h3>'; echo 'Your name is ' . $lastname . ' ' . $firstname; exit;
        $content = array(
            "amazin-product-name" => $_POST['amazin-product-name'],
            "amazin-product-tagline" => $_POST['amazin-product-tagline'],
            "amazin-product-description" => $_POST['amazin-product-description'],
            "amazin-product-url" => $_POST['amazin-product-url'],
            "amazin-product-button-text" => $_POST['amazin-product-button-text']
        );

        $product_box = array(
            'post_title'    => $_REQUEST['amazin-product-box-name'],
            'post_content'  => wp_json_encode($content), //broke when switched this from 'none' to the content array
            'post_status'   => 'publish',
            'post_author'   => 1,
            'post_category' => array( 8,39 )
        );

        // Insert the post into the database.
        wp_insert_post( $product_box );
    }
}
(Aside: I swear, I use JSON in everything I build. IT’S JUST SO USEFUL. Turns out WordPress even has a method for encoding stuff into json, so at least this feels legit.)
Anyway, this posts to the db. Hooray! Here is my form data, turned into a post and inserted into the db.
I included my earlier failures so that 1. I don’t look like one of those people who magically gets it right on the first try and 2. so you can see my earlier attempts at formatting the data correctly (the weird a:5 {… formatting is an artifact of using serialize() instead of wp_json_encode()).
Now I have this for my “post content”.
{"amazin-product-name":"TILCODE\'s New Book","amazin-product-tagline":"Tagline goes here","amazin-product-description":"Description goes here","amazin-product-url":"http://buy-my-book.com","amazin-product-button-text":"Buy my book!"}
(I’d have called this an “object”, since it’s wrapped in curlies and uses keys, but php likes to call this an array. I am new in php land so I will abide by its terminology and also call this an array.)
I suspected my form was insecure based on the fact that I had done absolutely nothing so far to secure it or sanitize the data sent through it.
So, before I went any further, I read a bit on WordPress plugin and form security. A lot of guides say that using something called a “nonce” (a number used once) is a good, easy way to secure WordPress forms. This page from the Codex explained it nicely and gave an example I could adapt to my own plugin’s code. Getting nonce working was easy though I’m not yet sure how to test that it’s actually doing what it’s supposed to. I’ll come back to this.
Day 4: Hiding the Product Box “posts” from the blog’s main Posts page and displaying them on the plugin page using Custom Post Types
I had a suspicion that my Product Box posts were showing up as normal Posts in WordPress, and sure enough, here they are:
These are product boxes, not posts, and I don’t want to see them when I view my blog’s Posts.
I did some reading and decided that this might be a job for custom post types. This tutorial even says, “One advantage of using custom post types is that it keeps your custom content types away from your regular posts.”
Good enough for me, let’s try it.
The only thing I wasn’t sure about was the part about “create post type” needing to be called “on init”. I wasn’t sure where that was in my plugin, but I guessed it belonged in the same block of code (at the top) that adds the plugin menu to the admin menu.
The code for actually creating the custom post type looks like this. I found this Codex page on registering post types helpful for identifying what parameters to include. (I can always come back and add more later, too, if I need to.)
To bring it all together, the last step was to modify the array of parameters that are passed when creating a product box post. There’s a param for “post_type”, so I added my “amazin_product_box” as the post type here.
Make a new product box, go back to php myadmin and reload the posts in the db and.. success! My newest product box is now of post_type “amazin_product_box”, and it is nowhere to be seen in the WP dashboard page for Posts.
I deleted all the “post” type product boxes to clean up the Posts screen. We’re gonna be amazin_product_boxes from here on out!
Displaying the product boxes on the Amazin Product Box admin page
So, now that they’re not in the Posts page anymore, maybe now’s a good time to get them to show up on the admin page as their creator intended:
Since they are now their own post type I thought it might be easy to select them by post type. The tricky part will be stuffing their data into my table (I mean, I don’t want the full posts displayed like they’re blog posts…).
Pick out its product name field, author name, last modified
Display each one as a table row using a loop
It wasn’t super difficult but it took some trial and error to get the date right and figure out how, exactly, to pick out things like author meta from a post ID.
Here’s what I ended up with:
If you’re thinking, “Wow, that’s kinda ugly!” you’re not alone! But I want to get all the hookups working before I venture off into styling land, so it’s going to stay ugly for a little while longer.
(The code’s a bit ugly with the php and HTML mixed together, but I’m not sure yet what the proper conventions are and there’ll be time to tidy it up later.)
Day 5: Hooking up the Delete buttons
Each existing product box should be able to be edited or deleted independently of the others. The Edit and Delete buttons are client-side (HTML) and the php methods they need to call are server-side. AJAX and JQuery to the rescue.
When faced with a novel problem (or just one that I know is going to take some trial and error), I like to do a bare minimum “wiring” as the first pass. For this particular bit of work, that meant 1. associating the post ID with each edit/delete button, 2. passing that ID into the JS methods, 3. logging that ID from the JS method to verify the hookup was successful.
Clicking Edit and Delete logs the post ID. From here, I’ll build up an actual edit and delete functionality.
Looks good – now I know the post IDs can make it over to the JS file’s methods.
Note: I had to include a versionnumber in my call to wp_enqueue_script and increment it every change to the .js file. This is called “cache busting” and without it, the plugin used a stale version of the .js code even though the latest was uploaded to the server.
Every time I change the JS code I increment the last parameter. Below, it’s at 1.06. Next time I update the JS code I’ll change it to be 1.07, and so on.
Using wp_delete_post() from the JS file was a no-go.
Turns out I needed to use Ajax, but WordPress is already set up for this sort of thing. I found this tutorial very helpful for this step. I skipped anything relating to permissions, confirmations, or security on this first iteration, but if you check out this commit, the delete button now deletes the appropriate row (it fades out!) in the table and in the wp database.
Securing the Delete functionality with a nonce
After getting a bare-bones delete functionality working, I went back to the same tutorial that got me started and followed its examples for adding a nonce. My code was a bit different than theirs, but a few educated (lucky?) guesses later and I had it working.
I put the nonce directly on the Delete button input itself like so:
Notice how the input tag accepts nonce=”…”. Surprisingly (to me, anyway) that’s valid syntax. Over in scripts.js I’m then able to pluck it out of the event (“e”) like so:
var nonce = e.target.nonce;
Here’s the commit that adds nonce to delete. I tested it by changing the nonce value on one of the delete buttons (to “12345”) and then clicking delete – and nothing happened. So the nonces do actually seem to do something. Hooray!
Building the “Edit” functionality
First, a few small UX changes: I removed the product name box field (I think I’ll just refer to boxes by their IDs, not by names) and exposed the ID in the table. This commit contains that work.
Populating the existing form
The first bit of work here was to make the Edit button populate the form with the existing post’s contents.
In scripts.js, an ajax call that calls an action (‘amazin_get_existing_post’) defined in the php part of the project and stuffs the data into the appropriate form fields upon success:
$ ( '#admin-table').on( 'click', '.edit-button', function(e) {
        console.log("Gonna edit a product box with ID:", e.target.id);
        var id = e.target.id;

        $.ajax({
            type: 'get',
            url: MyAjax.ajaxurl,
            data: {
                action: 'amazin_get_existing_post',
                id: id
            },
            success: function ( response ) {
                console.log( response );
                var data = JSON.parse(response.productBoxData);
                $ ("#product-name").val(data.productName);
                $ ("#product-tagline").val(data.productTagline);
                $ ("#product-description").val(data.productDescription);
                $ ("#product-url").val(data.productUrl);
                $ ("#product-button-text").val(data.productButtonText);
            }
        });
        return false;
    } );
(Hopefully that makes sense – the overall “journey” goes something like this: the clicking of the Edit button is handled in JS -> that JS method calls an action defined in the PHP file -> that PHP file action gets the post from the db and uses wp_send_json() to kick the data back to the JS method -> the JS method captures that data as the “response” parameter.)
Saving the form contents as an “update” to an existing post
The last bit of work to do on “Edit” was to make the form recognize two states: making a new one and editing an existing one. I chose to do this with a hidden ID field in the form. The hidden field holds either “undefined” or a post ID (placed there by getting a post to edit). When the user submits the form, it uses that ID (or lack of ID) to figure out what to do – either submit a new post or update an existing.
In this article: Steps I took to optimize a WordPress-based site for Google’s upcoming mobile search prioritization. It started with a PageSpeed Insights score of 8/100 and ended at 62/100.
Plugins used: W3 Total Cache
Time spent: Several hours of trial and error, but this guide should help you through it much quicker.
Google announced in January that they’re going to take a site’s mobile speed into account for searches beginning July 2018. I’ve always tried to make my WordPress sites mobile-friendly, but it looks like there’s some room for improvement.
One of my biggest (and highest-earning) sites scored just an 8 out of 100 for mobile optimization. Ouch.
What I’ve already done to optimize this WordPress site
I’ve managed this site for a few years and have already put some effort into optimizing it for search and mobile.
The site already scores well for these categories:
Avoid landing page redirects
Enable compression
Minify CSS
Minify HTML
Minify JavaScript
Optimize images
Prioritize visible content
Some of those scores are probably due to the site already using a CDN, lazy loading, a good caching plugin, and a good hosting plan. Here’s what the site uses:
However, there’s more work to be done! Here’s what I did to raise my Google Insights mobile score.
Fixing render-blocking JavaScript on above-the-fold content on a WordPress site using W3 Total Cache and a CDN
Let’s look at this render-blocking JS/CSS problem first:
Eliminate render-blocking JavaScript and CSS in above-the-fold content.

Your page has 8 blocking script resources and 12 blocking CSS resources. This causes a delay in rendering your page.

None of the above-the-fold content on your page could be rendered without waiting for the following resources to load. Try to defer or asynchronosly load blocking resources, or inline the critical portions of those resources directly in the HTML.
This message is followed by a list of all the JS and CSS scripts causing the render blocking, which were 8 JavaScript files and 3 CSS files in my site’s case.
These guides were helpful to me while working on this problem:
To fix the blocking JavaScript files I had to do a number of things to configure W3 Total Cache. This part took a couple hours of trial and error and some steps were not covered in the guides I used (or my situation was different from theirs), so I’ve attempted to document the process as I experienced it in this guide.
First, I enabled Minify in the general W3 Total Cache settings. Go to Performance > General Settings > Minify > check the “Enable” box and select the “Manual” radio button.
Next, go to Performance > Minify to work on minify settings as they pertain to JavaScript and CSS. You’ll need the list of blocking files from PageSpeed Insights report.
Watch out! The file paths shown in the PageSpeed Insights results might be truncated. To get the full path, you have to hover over the truncated path and copy the path from the tool tip.
In other words, make sure you are copying a complete path:
In Performance > Minify there are a variety of options that apply to all the script in a particular area (before head, after body begins, before end of body). In my case, code in the head tag was already minified, so I set it to “Combine only” (rather than re-minify it). I also needed to keep it blocking, or else my page filled Chrome’s console with “can’t find JQuery!” errors.
Next, under JS file management, add all of the blocking files from the PageSpeed Insights results – be sure to get the full file path, not the truncated version.
Also! If you’re using a CDN, you’ll have to change the domain in the file paths that you paste.
Instead of this:
https://your-cdn.com/wp-includes/etc
You need to use your website’s actual domain. For each path you paste, change the CDN part to be your site’s domain instead, like this:
Or you can remove that part of the url entirely and go with something like:
/wp-includes/etc
…which is what I did for mine:
Note: I needed to set the jquery files to embed in <head> to avoid a slew of console errors when visiting the site. As per the earlier settings, anything embedded in head is going to be blocking. I think some blocking files might be inevitable; the point of these settings is to tease out which files belong where in the load sequence.
Save settings and purge all caches, then test again in PageSpeed Insights.
Woohoo – no JS files blocking loading. I also tested the site manually, and verified that it doesn’t look like garbage and doesn’t fill the console with errors. So far, so good.
Fixing render-blocking CSS with Autoptimize
I initially set up all the CSS file paths in W3 Total Cache but ran into these two cases that I couldn’t figure out how deal with through W3 Total Cache alone:
To fix the Google Fonts, I installed the very lightweight plugin Autoptimize and checked these boxes:
I also used Autoptimize to disable Google Fonts. Whether you want to do this is up to you, but I went ahead with it because I am happy with a default system font for this site.
To fix the w3tc minify, I disabled CSS in W3TC and let Autoptimize handle it. I also had to uncheck this setting:
Finally, for the sake of completeness, here’s what my HTML minify settings look like:
At this point, I loaded my site and found it was using serif typefaces on buttons and it wasn’t scaling the hero (header) image correctly. To fix this, I added custom CSS to Autoptimize’s custom CSS section. This CSS gets loaded right away, so the page doesn’t get stuck waiting on the js or css to “fix” certain issues that are visible right away to a visitor.
One more thing: I also uploaded a significantly more compressed “hero” banner image jpg to the site (old size: about 350kb, new size: about 110kb).
The reward for all these optimizations:
Note that I still have one render-blocking w3tc js file. For now, I’m going to call this “good enough”, since I don’t know how to fix this last one without breaking some fundamental aspect of the site, so I’m going to move onto the expiry problems and see if I can get the score higher that way.
Fixing “leverage browser caching” with W3 Total Cache
PageSpeed Insights found a few files it thinks could leverage browser caching. These files are all .js files.
The first step is to enable browser caching in W3 Total Cache’s settings. Go to Performance > General Settings and make sure Browser Cache is enabled.
Then, go to the actual Browser Cache section of the plugin. As per the guide, I ensured these boxes were checked:
Set expires header
Set cache control header
Set entity tag (eTag)
Set W3 Total Cache Header – this one was not already checked for me
Enable HTTP (gzip) compression
(I re-ran the PageSpeed Insights test at this time just in case that one checkbox was all it took. Alas, there was no change in the results.)
The next thing I did was scroll down a little bit to the CSS & JS section. My “expires header lifetime” was set to 172800, which is way less than the recommended 604800 (2 weeks) the guide recommends. I saved that change, cleared cache, and ran the test again.
Now I have just three files with unsuitable caching times:
Alas, two of the remaining files are out of my hands: they are Google Analytics’s own .js files. After reading this guide to browser caching Google Analytics, I decided not to try to cache the analytics js file myself. Doing so would require manually updating it periodically. Even the guide’s author says they don’t recommend this method. That’s fine by me.
But how about this emoji js file? I don’t use emojis on my site, so I wouldn’t mind removing them and reaping a small page speed boost.
Normally, removing them is as simple as adding these two lines in your site’s functions.php:
But I’m using a pro theme that gets automatic updates (which will clobber this code if I add it to functions.php), and I don’t want to make a child theme for the express purpose of removing emojis.
So, I did what any good WP user does and installed yet another plugin: Disable Emojis. (Yes, I also canceled Christmas and summer break while I was heartlessly removing emojis from my very srs blog.)
I ran PageSpeed Insights again and….
Woohoo! (It initially came out worse, but network latency has some affect on the score, too. I tried again and got a 62/100).
My report has never looked better:
PSI estimates this page requires 2 render-blocking round trips and ~26 resources (0.4MB) to load. The median page requires 4 render-blocking round trips and ~75 resources (1MB) to load. Fewer round trips and bytes results in faster pages.
Fixing the “flash of unstyled content”
A new problem has been introduced by all this work: now my page looks unstyled for half a second or so while it’s loading.
I used this tool: Critical Path CSS to identify a the “minimum” CSS needed to make the “above the fold” content look good (it’s a huge block, I’m sure a human could produce something more elegant but for now, it’ll do).
I put this CSS into Autoptimize’s “above the fold” CSS section and the flash of unstyled content seems to look better now, though I still see the fonts looking bad before the preferred “open sans” style comes into effect.
Done… for now
At this point, I’ve gotta call it good enough for now. My site’s score went from 8/100 to about 62/100. I still have a one blocking JS file that I don’t know what to do with and two files from Google Analytics with unsuitable cache expiration times.
I’ll update this page when I make further improvements to the site.
That referrer, cdn1-mycompany.netdna-ssl.com, isn’t allowed to serve this file. But there’s an easy fix: you can whitelist the CDN itself in the CDN.
The fix: whitelist the CDN itself
In MaxCDN, go to Pull Zones > Security > Whitelist.
You might already have yourdomain.com in here. What you need to add is the domain your CDN files are pulled from.
In my case, that was a domain that took the form of cdn1-mydomain.netdna-ssl.com, but you can find out what yours is by looking in the Network tab while you try to load your site. Look for a red-colored error message and open the Headers.
Anyway, the fix is as easy as adding the domain to this list of whitelisted domains and waiting a few minutes (for me it was about 10 minutes). Reload your website and the Font Awesome icons should now appear.
Note: You will probably need to Purge All Caches, too, once the time has passed to actually see the change in your browser (I use the dropdown in the WP toolbar).
My W3 Total Cache settings
(Just in case it’s useful to someone else trying to debug this problem)
My W3 Total Cache settings are set to upload .css, .tff, .otf, .woff, and .woff2 files.
One of my WordPress-based sites uses this particular combination of plugins and utilities:
WordPress version 4.8.2
W3 Total Cache
MaxCDN
And this was the disappointing, image-less result I got whenever I shared one of its posts on Twitter:
Twitter/Facebook missing image debugging tools
Here are two tools I used while debugging my missing images problems on social media.
Rather than spam your friends or pollute your feed with tests, you can use Twitter’s own validator and Facebook’s sharing debugger to try your posts and see how they render.
Problem 1: My site’s posts didn’t define any Open Graph images in the first place. I figured Twitter, Facebook, etc. were smart enough to scrape the post and pick an image all on their own, but it seems that’s not always the case.
Now, at the bottom of every post, is the option to explicitly define an image to use when sharing. This image can be larger than images you might normally include in a post (maybe even custom-made for the purpose) and need not appear in the post itself. (Unfortunately, you do have to go back and manually add an image to each post.)
After doing this I was still getting a 403 when previewing my post in the Facebook and Twitter tools.
Problem 2: The other part of the problem was with my CDN settings themselves. Twitter (and Facebook, etc.) aren’t actually allowed to link to images hosted on my CDN – they aren’t whitelisted. My CDN is set up to only serve images on my site itself, so other people can’t link directly to my CDN images and effectively steal the bandwidth that I pay for (truthfully, I wish people were this eager to link to my content).
I had to add Facebook and Twitter to my W3 Total Cache’s list of rejected user agents.
Under the Performance tab (left side of WordPress interface), click on CDN:
Then scroll down into the Advanced section and find “Rejected user agents”. Type facebook.com and twitter.com. These agents are not allowed to access files hosted within the CDN. (Which is what we want, because the CDN won’t let them do it anyway.)
You may need to also do Performance > Purge All Caches from the top toolbar in WordPress, too.
Finally, the Twitter and Facebook previews have images!
I just moved one of my blogs to a new host (yay!). This blog uses MaxCDN for its content delivery, and moving the blog to a new host messed up the site’s styles and it took me a while (plus some back and forth with support) to get everything fixed because MaxCDN was still referencing the old host.
In case I ever do this again, here’s what needed to be done to move my WordPress blog to a new host with MaxCDN as my content delivery network.
Step 1: Add a CNAME record to your new host
My new host has CPanel (Digital Ocean, by contrast, had a Networking tab with a link to Domains and their records were accessible through there). If you have CPanel, click on Simple DNS Zone Editor.
Add a new CNAME record. It’ll probably look something like this:
Name
cdn1.yoursitename.com.

Record
cdn1.yourbusinessname.netdna-cdn.com
(Your CPanel might add the . at the end of name for you, and it might autocomplete for you if you just type the subdomain portion and then tab out of the field.)
Note: I use a custom domain in MaxCDN because I don’t want it to use the default “business name” URL that MaxCDn gives you.
Step 2: Update the Origin IP over in MaxCDN’s settings for your pull zone
Go to Zones > Pull Zones > Settings and get into that particular pull zone’s settings. At the bottom is Origin Information. Check the checkbox and enter the IP address for your new host. Click Update button to save.
Step 3: Whitelist your new IP
Go into your Account > look under the API section > click Manage > add your new IP as a whitelist IP.
You may also need to whitelist your own IP address, if you get problems with cURL requests failing when you try to clear CDN cache.
Step 4: Update your WP caching plugin
You may need to reconfigure your WP cache plugin. I use W3 Total Cache which, for reasons unbeknownst to me, likes to replace my entry for “Replace site’s hostname with:” with the word “Array” instead of the URL I give it.
For reference, “Replace site’s hostname with:” should be followed by your cdn url, like cdn1.yoursite.com.
Step 5: Purge all caches and check your site
When you’ve done all of the above, purge your CDN cache and your WP cache via your caching plugin.
It might also help to flush your local DNS. I’m on Windows and I do that in a command prompt with ipconfig /flushdns
Open a Chrome incognito tab and load your site – if your styles and images load, you’re good to go. If your site looks incomplete, look in the console for an error message. I found many of them (like 502 bad gateway) to be covered in MaxCDN’s documentation.
If you are using a custom domain with MaxCDN like I am, then putting that custom domain into whatsmydns should yield the actual “business” domain in the results list. In other words, if you search for cdn1.yourcustomdomain.com and you get responses of cdn1.yourbusiness.netdna-cdn.com, you’ve got it set up correctly.
What’s your site’s IP? In a command prompt / Terminal window, ping yoursite.com to get its IP address.
Is your CDN URL responding? In a command prompt / Terminal window, ping cdn1.yourcustomdomain.com and see if you get anything. If it can’t find your host, this could indicate an error with your CNAME record with your new hosting service.
Are you seeing stale or current stuff in your browser? I use Chrome incognito because each window starts with a fresh cache and no cookies. CTRL SHIFT N opens up a new incognito window.
You may also want to flush your DNS in between tests. ipconfig /flushdns does this in Windows.
If all else fails, email MaxCDN’s customer support. Even on a US holiday, I got a response within 20 minutes and they helped me get things working again.
Moving a WordPress site from one host to another with minimal of downtime doesn’t have to be a huge hassle, and it’s easy to do it yourself even if you aren’t a web developer. Here is the process I use to move a WordPress site to a new host, with about 10 minutes or less of actual downtime (and because of caching, many visitors during the migration may not even see the outage).
I like this method because:
It’s easy
You don’t have to mess around in MySQL
It’s free
It’s maybe 10 minutes of downtime for your site, depending how fast you can upload your backup and how much you have to do to get your caching plugin/CDN (if you have them) on board with the new IP address
Before you begin, make sure you have:
A WordPress site on your current host
Access to your new hosting account (preferably with CPanel and phpMyAdmin to get the most out of this guide)
Access to your domain’s DNS records (yoursite.com may be registered with your current host, or a separate registrar)
Nameservers for your new host (they usually look like ns1.newhost.com)
FTP access to old host and new host via your choice of FTP software (I use Filezilla) *optional* – you can do the same stuff through your host’s CPanel File Manager if they have it
About an hour of time to dedicate to reading this guide and the actual migration
Step 1: Install UpdraftPlus plugin on your site
Log into your WordPress dashboard (http://yoursite.com/wp-admin) and install the free UpdraftPlus plugin.
This plugin is awesome and I recommend it for use outside of just moving your WordPress site to a new host. Here’s why:
The backup files do actually work (this plugin has saved my ass a couple times now)
You can use it to make a manual backup of your site at any time
You can set it up to create automatic backups and put them on the cloud storage service of your choice (personally, I back up to Google Drive)
Step 2: Use UpdraftPlus to make a backup of your site
Use Backup Now to start the backup process.
I like to do this right before I’m ready to start the migration process, so the backups are as fresh as can be.
Step 3: Download your backup files
Go back to your UpdraftPlus plugin page and go to the Existing Backups tab. Find today’s date and click each of the buttons (database, plugins, themes, uploads, others).
Updraft will prepare each backup file for you (there are 5 total). Wait for Updraft to prepare the files, then click Download to your computer for each one.
You’ll get 5 compressed files:
Step 4: Set up an account with your new host and install WordPress there
If you haven’t done so yet, sign up for an account at your new host.
I use the StartUp package for my up-and-coming sites, and the GoGeek plan for my top performers. You can upgrade your plan at any time as a site grows. I especially like the GoGeek plan because they throw in SSL for free (or at least they did for my first year) and because it has a separate staging environment for testing stuff on a copy of the site before pushing it live.
Next, install WordPress on your new host. Many modern hosts (including SiteGround and BlueHost) have an easy one-click install for WordPress nowadays – look in the CPanel or just the dashboard in general once you’re logged in.
Don’t worry about picking a login/password you want to use in the long run, your Updraft backups will replace whatever you choose during setup with whatever your existing site already has. Do write down whatever name/password you choose here, you’ll need it to access your new WP install until you overwrite it with your backups.
It’ll probably tell you the installation was successful and you can go see it at the following url, but that link won’t work because you haven’t updated your domain’s nameservers yet.
Step 5: Change your domain’s nameservers
I do this in dynadot.com’s domain manager because that’s where my domain is managed, but your domain may be attached to your old hosting. In any case, change its two nameservers from ns1.oldhost.com and ns2.oldhost.com to ns1.newhost.com and ns2.newhost.com (or similar).
It should propagate fairly quickly (check it here: https://www.whatsmydns.net/) but it may take a while to see the change on your machine. One way to speed it up (on Windows, anyway) is to open a command prompt (cmd) and type ipconfig /flushdns.
Load your site again (in an Incognito window in Chrome or after clearing browser cache) and you should now see your new WP install.
Step 6: Install UpdraftPlus on your new blog and restore backups
Now that you have dashboard access to your new WordPress installation, install UpdraftPlus and click Restore.
Drag your 5 files here and wait for them to upload.
When those are done uploading, click Restore.
Follow the prompts until you’re force to re-log in to your site. It should now look exactly like it used to on your old host, but you can confirm that it’s actually on your new host by pinging it in a command prompt or Terminal window (ping yoursite.com). If the IP address returned matches your new host’s, you’re good to go.
Extra step for CDN users:
I’m on MaxCDN, but regardless of what CDN you use (if you use one) there will probably be some additional setup steps to make sure your existing CDN account references your new IP and host.
Step 7: You may need to do some other setup on your new host
Leave your old host active for a little while while you confirm everything’s working on your new site over the next couple days.
You may need to move the following separately:
Email accounts. If you had email accounts set up at your old host, take note that they don’t come with the Updraft migration and you’ll have to recreate them (and redo any redirects) on your new host.
Favicon: if your site had a custom favicon sitting in your site’s root directory, you might need to copy it from your old host and upload it to your new one
Google Analytics .html file: If you put any .html files for analytics tracking (Google Analytics is the one I always have to move manually) in your old site’s root folder, you will have to copy them to your new host
Robots.txt and anything else sitting in root (this will vary by site)
Images or other media in dedicated folders: Anything that’s part of your site but not part of WordPress will have to be manually moved. For me, this is sometimes a site logo or images on the site that I keep in a separate images folder, not uploaded to WordPress’s file manager.
If you’re afraid of losing anything off your old site, take the time now to download a copy of its entire directory off your old host, before you shut down your old hosting account. That way, if you find something missing later on, at least you can dig around the old files and maybe find it.