In this post: A detailed, step-by-step guide demonstrating the steps I use to solve a problem similar to one encountered in my CS 372 Intro to Networking class.
You’re given a link with a maximum transmission rate of 70.5 Mbps. Two computers, X and Y, want to transmit starting at the same time. Computer X sends File X (18 MiB) and computer Y sends File Y (130 KiB), both starting at time t = 0.
Statistical multiplexing is used, with details as follows
Packet Payload Size = 1000 Bytes
Packet Header Size = 24 Bytes (overhead)
Ignore Processing and Queueing delays
Assume partial packets (packets consisting of less than 1000 Bytes of data) are padded so that they are the same size as full packets.
At what time (t = ?) would File X finish transmitting?
Suppose they want the answer in seconds (hah – not milliseconds like usual!) and they want it rounded to two decimal places.
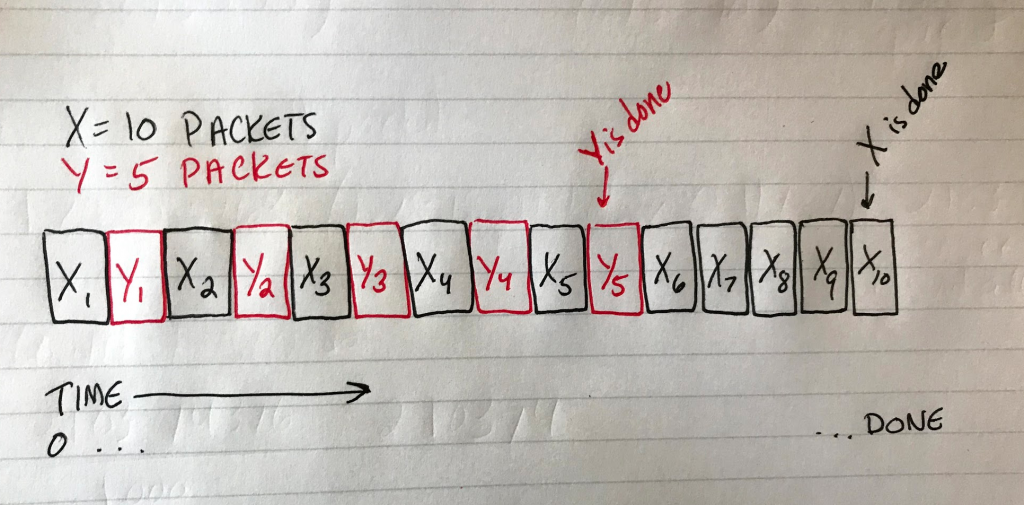
The “twist” of this problem is that File X and File Y take turns being sent in little chunks of 1000 bytes (plus 24 bytes of overhead).
First a piece of X goes, then a piece of Y, then back to X, etc.
Y is smaller so you run out of Y before you run out of X, but fortunately for us, this problem wants to know when X is done being sent. So really what we’re looking for is how long it takes to send both X and Y.
Here’s a drawing I made to visualize the problem (obviously, X and Y are both way more than just 10 and 5 packets in our real problem).
Diagram depicting X1, Y1, X2, Y2, X3, Y3, X4, Y4, X5, Y5, X6, X7, X8, X9, X10 interwoven with each other. Each block represents a packet.
Step 1: Figure out how many packets have to be sent, total
Our packet size (1000 bytes) and our overhead size (24 Bytes) are given in bytes, so I’m going to turn the two filesizes into Bytes instead of bits for this one. (We can always turn it into bits later if needed.)
File X = 18 MiB // turn to bytes by multiplying by 1024 twice
= 18 * 1024 * 1024
= 18874368 bytes
File Y = 130 KiB // turn to bytes by multiplying by 1024 once
= 130 * 1024
= 133120 bytes
Now X and Y are in the same units (bytes) and we can use that to figure out how many packets of 1000 bytes each one would be divided into.
File X = 18874368 Bytes / 1000 = 18874.368 packets
Our result isn’t a whole number. What should we do with the “partial packet”? Well, the problem tells us that any partial packets should be padded up to a full size. In practice, this just means we round up to the next nearest whole number. 18874.368 becomes 18875 packets for File X.
Now do the same for File Y:
File Y = 133120 Bytes / 1000 = 133.12
Round up to get 134 packets for File Y
(Save these numbers for later, we’ll come back to them.)
Step 2: Calculate the time needed to send one packet plus its overhead
Add the packet size and the overhead size (both must be in the same units; here, that’s bytes but your variation of this problem may differ). Since transmission rate is in bits, let’s also multiply the packet size + overhead size by 8 to put it in bits, and multiply the transmission rate by 10^6 to put it in bits also. That looks like…
L/R, where R's units is what the outcome of this calculation will be
= (1000 Bytes + 24 Bytes * 8) / (70.5 Mbps x 10^6)
= (8192) / (70.5 x 10^6)
= 0.0001161985816 seconds // same units as R (bits per second)
= 0.11619858156 msec // multiply by 1000 to get milliseconds
We now know that it takes 0.11619858156 milliseconds to send one packet (and its overhead). Save this number for later.
Step 3: Calculate the time it takes to send all packets
This step is easy: we know how many packets we have between File X and File Y, and we know how long it takes to send one of them, so let’s figure out how long it takes to send all of them.
18875 packets + 134 packets = 19009 packets to send
19009 packets x 0.11619868156 msec = 2208.820738 milliseconds to send all
Step 4: Convert to seconds and round to 2 decimal places to get the final answer
This variation of the problem wants the solution in seconds, so divide our result from Step 3 by 1000 to get 2.208820738 seconds and round it to two decimal places to get 2.21 seconds, which is when time at which File X will be done sending.
What if it wanted to know when the smaller file was done sending?
Well, let’s look at our diagram again. Here we can see that for every packet of Y sent, a packet of X has already been sent.
For every packet of Y that is sent, one from X precedes it. In other words, to send all 5 packets of Y we must also send 5 packets of X.
We know Y is made up of 134 packets, so that many packets of X will also be sent. That means for our final answer all we have to do is figure out how long it’ll take to send 134*2 packets.
134 * 2 = 268 // all of Y + same amount of X
268 packets x 0.11619868156 msec = 31.14124666 msec to send File Y
Convert that answer to seconds and there we have it: 0.03 seconds have elapsed when File Y (the smaller file) is done sending.
In this post: A detailed, step-by-step guide demonstrating the steps I use to solve a problem similar to one encountered in my CS 372 Intro to Networking class.Yeah, I’m still cranky that this class makes no effort to teach this stuff. They just send you a-Googlin’. Welcome, Googlers…
Suppose there are 3 routers in sequence between Host A and Host B, all of which use store-and-forward routing. What is the total end-to-end delay for a packet originating from Host A with destination Host B, under the following conditions.
Each of the link transmission rates are 5.1 Mbps
The total distance from Host A to Host B along its path of transmission is 175.1 km
The speed of propagation through the transmission medium is is 2.7 x 10⁸ m/s
The packet size is 2 KiB
Remember that you must also uplink from Host A to the first router. Suppose this one wants the answer in milliseconds rounded to 1 decimal place.
Step 1: Figure out the transmission delay for one link
The “twist” of this problem is that there are multiple transmission delays to account for. Every “hop” incurs a transmission delay.
We can use the L/R formula with the known packet size (2 KiB and known transmission rate (5.1 Mbps) to calculate the transmission delay for one node to another. Node here means host or router. Be sure to convert both into bits.
Remember that the units R is in determines the outcome, so this result is in seconds. Multiply it by 1000 to turn it into milliseconds and save this result for later.
0.00321254 x 1000 = 3.21254901... milliseconds
Step 2: Figure out the entire path’s transmission delay
Recall that our three routers and two hosts basically look like this:
[A]—[1]—[2]—[3]—[B]
We know the transmission delay (the time it takes for a bit to be placed on the transmission medium) at one host or router, and we know how many routers there are total, so we can figure out how many “transmission delays” our bits will go through by multiplying the total number of routers plus one (to account for being placed on the transmission medium by A) by the transmission delay we calculated in step 1.
(R + 1) * 3.21254901  // R is the number of routers
= (3 + 1) * 3.21254901 // add 1 to account for initial link
= 4 * 3.21254901
= 12.85019604 milliseconds
This number represents the total amount of transmission delay experienced by bits traversing this multi-router path.
Step 3: Figure out the propagation delay
Recall that our distance is 175.1 km and our speed of propagation is 2.7 x 10⁸ m/s and the propagation delay formula is Tprop = d/s. Note that km has to be turned into meters and the result will be in seconds.
In this post: A detailed, step-by-step guide demonstrating the steps I use to solve a problem similar to one encountered in my CS 372 Intro to Networking class.
The “VOIP problem”
You’re given a diagram (you won’t need it) and some values in the form of…
Host A converts analog to digital at a = 40 Kbps
Link transmission rate R = 4.2 Mbps
Host A groups data into packets of length L = 51 bytes
Distance to travel d = 900 km
Propagation speed s = 2.5 x 10⁸ m/s
Host A sends each packet to Host B as soon as it gathers a whole packet.
Host B converts back from digital to analog as soon as it receives a whole packet.
The question asks, How much time elapses from when the first bit starts to be created until the conversion back to analog begins?
Let’s say they want the answer in milliseconds rounded to two decimal places (note: this varies – sometimes the answer has to be in seconds, sometimes they want it rounded to one decimal place – double check your instance of the problem!)
Step 1: Figure out how long it takes to make a single packet
“When the first bit starts to be created” means “when this imaginary machine starts building the very first packet”.
We know how big a packet is: 50 bytes.
We know the rate at which it produces packets: 40 Kbps.
This is the classic L/R (length over rate) you’ve hopefully seen if you’re keeping up with the course materials. We can use L/R here, but we have to turn 51 bytes into bits (multiply it by 8) and we have to turn 40 Kbps into bps (multiply it by 1,000).
We get 0.0102 seconds because the units that R is in determines the outcome. R is in bits per second (bps), so that’s how we know the units we’re looking at here is seconds.
We need this in milliseconds, because we’re going to put everything in milliseconds so that we’re working in the units the question expects. Multiply the seconds answer by 1000 to get milliseconds, like so:
0.0102 x 1000 = 10.2 milliseconds
That’s the time it takes to make one single, complete, ready-to-transmit packet. Save this value for later, we will come back to it in step 4.
Step 2: Figure out the transmission delay
Recall from the course materials that transmission delay is the time it takes to place every bit onto the transmission medium. Transmission delay is not the time it takes to actually send it!
If you like car analogies, consider transmission delay the time it takes to get your car onto the highway. Your car is being placed on the transmission medium, and the time it takes to do that is the transmission delay. (Again, this is not the time it takes to travel the length of the highway! It’s the time it takes to get your car onto the highway.)
We will use the L/R formula again for this step. This time L is the length of the packet (51 bytes) and R is the transmission rate (4.2Mbps). We need both of them in bits, so multiply 51 (bytes) by 8 to get bits, and multiply 3.8 by 1,000,000 to get bps.
Again, the units of R determine what units the result is in, which in this case is seconds (because we had bits per second for our R).
To turn it into milliseconds, multiply by 1000:
0.00010737 x 1000 = 0.10736842 milliseconds
So, what do we have so far? We have the time it takes to make one packet and the time it takes to transmit that packet, both in milliseconds. There is one missing piece: propagation delay.
Step 3: Figure out the propagation delay
Propagation delay is the time it takes a bit to travel the given distance (900 km) at the given speed (2.5 x 10⁸ m/s). The formula for propagation delay is d/s (distance over speed).
To go back to our car analogy, the propagation delay is the time it takes the car to zoom down the highway to its destination.
Like L/R, the d/s result will be in the same units as the bottom number (so, seconds). However, before we proceed, note that the distance we were given is in kilometers and the speed is given in meters per second. We need to convert kilometers to meters when we do our calculation, so multiply that 900 by 1,000.
(900 km * 1,000 / 2.5 x 10⁸) = 0.0036 seconds
Remember to convert that answer to milliseconds:
0.0036 x 1000 = 3.6 milliseconds
Step 4: Add the previous three answers together
Time to generate packet + time to place it on the transmission medium + time for it to propagate = our answer
Step 5: Round to the requested number of decimal places
Since this problem wants the answer rounded to two decimal places, 13.90736842 becomes 13.91
I hope this breakdown of the “VOIP problem” helps someone else!
I have to admit I’m a bit salty this class had us sit through all those lectures, read all those book chapters, and do all those worksheets and couldn’t once be bothered to expose us to even a watered-down or partial version of it before throwing it as us on a graded, timed quiz.
Fortunately, once you’ve mastered solving this problem, a lot of the other “math problems” that CS 372 throws at you in week 1 and week 2 will feel like variations on it.
This post is part of an ongoing series recapping my experience in Oregon State University’s eCampus (online) post-baccalaureate Computer Science degree program. You can learn more about the program here.
Six-word summary: A well-designed and satisfying course
I feel like I sometimes write these recap articles to complain and warn other students of landmines, but CS475 was what every OSU online CS course should be: organized, succinct, and educational. I learned so much and enjoyed the course from start to finish.
CS475 Review
It only runs in the Spring quarters, but it’s worth holding out for! You’ll learn a lot, the material is interesting, the course is well-paced, and the exams felt fair.
I picked this class because parallel programming was something I thought sounded intimidating and was unlikely to be something I would attempt on my own. I’m very glad I chose it! It was way less intimidating than I feared, and now I feel entry-level competent in a subject I formerly knew nothing about.
Class structure
10 weeks
8 programming assignments where you code, run the code, and then write an analysis of it
I spent about 7-10 hours on this class each week, making it one of the lighter workloads in the program
Proctored midterm, proctored final
Weekly quizzes in Canvas (usually 5 questions with a full hour to answer them)
About 1-1.5 hours of video lectures each week (sadly they are without captions, but they are very high quality otherwise)
Some code is provided for you to use, saving time for focusing on what the class is really about
Instructor attends office hours! He’s really approachable, you should go even if you don’t have a specific question!
The instructor is SUPER active! You can get on a video chat with him – he’s just sitting there at pre-announced times, waiting for people to show up to his video chat room! He’ll look at your code! He’ll talk to you 1:1 about topics! I’ve never had such a productive “office hours” experience as I did in this class, and I didn’t even show up with any questions.
Contrast this with how most classes in this program hand you a problem and set you loose on figuring it yourself (via Google, Stack Overflow, old projects posted to GitHub, etc). There’s a time and a place for that, sure, but for $2000 in tuition I’m happiest when the class makes me feel like I learned something from the person teaching it. I want an experience I can’t get from Google and an independent project. I want an intelligent, skilled person to say “here’s what I know, and here’s how I think about it”and that’s how Professor Bailey ran this class.
Prof. Bailey also sends out an anonymous survey at the end of the course asking for feedback on each and every assignment as well as time spent. He genuinely cares about the class.
CS475 Project Structure
Unlike most classes, CS475 hands you some “starter code” for every assignment. You still have to put it in the right place, call it at the right time with the right data, and format and analyze the output yourself, but being provided this “starter code” was great for a few reasons:
Less time spent on things that aren’t the point of the assignment
No super fancy math skills needed (the bezier volume calculation formula is given to you, for example)
Less likely that you’ll go off into the weeds and do something ridiculously wrong and miss the point of the assignment
Less time needed overall for each assignment
This class has you throw nearly 100% of your efforts towards parallel programming related coding and analysis. For those of us with a finite number of hours in a week it was so good to just focus on the subject of the class and skip some of the boilerplate project setup. This class would pair well with another less-time consuming class, if you need (or prefer) to double up.
Most of this class’s projects go something like this: start a new C project, bring in the starter code, refactor/add to it to make it do what you need, write a bash script (or whatever you prefer) to run a loop and pass different parameters to the program each run, get all of the output in your Terminal (some people write it to a file), dump the output into a spreadsheet (I used Google Sheets), create graphs and write your analysis (in response to prompts).
Typical project output – here’s my output from Project 2
Bring these into your favorite spreadsheet software and create a pivot table. Then, generate the needed graphs for your analysis.
Somehow I made it this far in life without ever needing a pivot table. In this class, pivot tables made graphs a cinch.
And that’s pretty much how the assignments go.
I was a bit intimidated by this class before I took it. People say it’s dry and the subject has a reputation for being challenging, so I wanted to show other prospective students what’s actually involved and how approachable it really is.
Tips for CS475
NVIDIA CUDA support is limited on some versions of Mac computers. (For example, Apple just doesn’t support it for OS 10.14 at the time of this writing). If you’re on a Mac, I suggest using the school-provided rabbit server for your CUDA assignments and not wasting hours like I did trying to get it all working on a Mac.
Go to the office hours! Seriously, I went on a whim near the end of the quarter and was surprised to find myself alone in a video chat with the professor. I was just going to lurk but it ended up being a great chance to discuss a bunch of class topics one on one. Another student showed up and he stepped through her previous assignment code with her. You can’t beat the value of having an expert review your code with you!
The exams are straightforward. Some classes in this program use exams as an opportunity to test your speediness and your ability to keep track of registers through multiple iterations of multiple loops, but this class kept it fair and simple: watch the lectures, take notes, study those notes and you’ll do fine! He even gives a generous amount of time for the exams.
Overall, it’s just a high quality course. The lectures were freshly recorded, well-paced, on-topic, and relevant to the assignments and tests. The weekly assignments always looked challenging at first but were ultimately quite doable and enjoyable.
I’ve got just 4 classes left to complete my degree. I’ll be back in the fall quarter for Intro to Networks! See you all then!
This post is part of an ongoing series recapping my experience in Oregon State University’s eCampus (online) post-baccalaureate Computer Science degree program. You can learn more about the program here.
Six-word summary: Four final projects in a row
CS344 is your chance to work on four large, back-to-back projects that cover a breadth of topics. They feel a bit contrived (ie: more like schoolwork than real-world problems) at times and their application to real problems might be hard to see at first, but there’s no denying it: doing four big projects in a row will level up your skills a whole bunch.
CS344 Review
This course picks up where other C courses left off and introduces some new and exciting features, such as bash scripting and mutual exclusion locks.
The projects are utterly massive – any one of them could’ve been CS162’s notoriously huge final project – and the course comes off as feeling more like an advanced C course than an operating systems course because of it. You do a lot of project setup and boilerplate in this class (but you do touch on a long list of OS topics as well). Sometimes the new thing (whatever the actual point of the assignment was) only takes minutes to add, like a little cherry on top of a 5-tier wedding cake of a C project.
Class structure
10 weeks
4 programming projects with about 2 weeks each
Bash and C programming language
No midterm, open-book (but timed) final
Due dates are kinda all over the place, best to triple-check them (they don’t follow a pattern)
Grading script FTW
CS344’s best feature is the clarity of its expectations. Unlike many of the courses that came before it in this program, this one is VERY CLEAR about what’s expected and how you’ll be graded on it. They hand you a grading script that runs your program code and spits out a list of results (pass/fail) or something for you to interpret. When it all passes, so do you. It’s that simple.
Overall, this class is fair and straightforward. It’s one of those classes you just gotta be disciplined and hardworking in, and it’ll reward you by introducing you (in a fairly friendly way) to topics such as sockets, locking threads, writing bash script, making your own shell, and more. I’m not sure I would have pushed myself through some of this stuff on my own – the project where we wrote our own shell was definitely intimidating at first – but I’m glad the program included this class and these opportunities. I think I learned a lot in CS344!
Tips for CS344
You don’t have to code on the school server. The class will tell you up and down and over and over to code in VIM on the school server. You don’t have to. I did the whole class on my MacBook in SublimeText and I transferred the files to the school server for testing using FileZilla. It’s just bash and C code, there’s no reason to isolate it the way the class tells you to.
I think this whole “only work on the school server” stuff is bad advice. The programs in this class are large enough to justify a text editor and working locally makes it easy to use version control (which you should absolutely be using – at least one person in my class lost their work by compiling over their .c files on accident :( ).
I kinda wish I’d taken it alone or with a less time-consuming class. I paired it with CS340 (Databases) and the two classes just took turns being hellishly time-consuming. It’s like right on the fence of being a “better off alone” class. By itself it might’ve felt light, but paired with anything I was constantly strapped for time. YMMV.
This post is part of an ongoing series recapping my experience in Oregon State University’s eCampus (online) post-baccalaureate Computer Science degree program. You can learn more about the program here.
Six-word summary: Surprise, it’s a web development class!
You’ll glance at some database topics in CS340, but you’ll put most of your effort into building a big full-stack website.
CS340 Review
Get ready to sharpen your web skills! You’ll work with a partner the entire quarter (try to pick a good one!) to design and implement a website that interfaces with a database. This class is very heavy on web development. You’ll make tables to display data that comes in from the db, forms that can create, update, and delete data, and you’ll need it all up and running on the school’s servers by end of quarter. Course pacing is uneven and the numbering of assignments, projects steps, and assignments is borderline illogical.
I HIGHLY recommend finishing 290 before you take 340 so that you can use your last 290 project as starter code for 340’s. It’s criminal that people say you should take 290 and 340 simultaneously. Don’t do it. One of the last projects of 290 is a node.js website that interfaces with a database, and if you have this project complete, you have a fantastic head start on 340’s website project.
Class structure
10 weeks
No midterm, no final
Pick your partner in the first week
Each week you make progress towards a completed website project with your partner
Some weeks require “peer review” in which people from outside your group look at what you turned in and critique it (and you, in turn, review others’ work)
Hits hard in the last few weeks of the quarter when you have to put the entire site together. Start early.
The first week is slow: you’ll pick a partner and you’ll import a database dump into the database tool of your choosing. You’ll sit on your hands after this ~30 minutes of work is complete.
This is a good time to figure out what you want your site to be. My partner and I did a museum ticketing system and found it easy to hit all the requirements. Don’t reinvent the wheel here.
Each week you’ll work on an ever-growing document outlining your plans. No one will read it, but you’ll submit it every week nonetheless. There is absolutely no TA feedback at any point in this class. I finished this class without so much as a “Looks good!” from a TA.
About midway through the quarter they’ll give you an assignment to build the HTML portion of your site. If this is all you do this week you’ll probably fall behind, because each week after this has a much higher workload. You should immediately look at your projects from 290 to get started with the routing and db queries once you’re happy with the HTML.
There are no exams and no quizzes.
CS340: Too light on database-specific stuff
For a database class, this class is (sadly) rather light on hands-on query writing. It tries to teach database design, which is appreciated, but I think it spends too long belaboring minutia relating to the design diagrams (we must’ve done three iterations of ours before the precise requirements finally became clear on Piazza). It also spends weeks on the diagrams – one would’ve been enough.
The two places CS340 has you get your hands dirty is on Mimir for a few query-writing assignments and in your quarter-long website project. This is where the class shines: where it’s actually teaching (or forcing you to figure out on your own) how to interact with a database to do something useful.
CS340’s Mimir assignments
Rather than write SQL queries in any kind of industry-standard tool, CS340’s query writing is done in a browser-based tool called Mimir. Deadlines are generous and the work takes maybe 2-5 hours to get through (per assignment). Mimir is slow and the feedback it gives is not as robust as what you might get in a better tool. CS340 does give you the db dump, so you can go play around in a better environment (I used MySQL Workbench) but sometimes syntax that works locally does not work in Mimir.
Nonetheless, the Mimir-based parts of the course are some of the best parts. Experience writing queries is a skill you can take to an interview and job. I just wish there had been more of it.
CS340 group work
“What one engineer can do in one week, two engineers can do in two weeks.” The adage holds up in CS340. My partner was great, but I think I would’ve moved faster through the project without having to coordinate with someone else. There’s a lot of overhead in keeping someone else in the loop, not duplicating work, waiting for input before continuing, etc.
A few weeks into the quarter, everyone gets assigned a random group of 5. This is your “peer review” group. (Your partner will be in his/her own peer review group). Since 340 doesn’t seem to feature any TA feedback, this is what the class gives you instead: feedback from other students who probably know the same or less than you do about what you’re working on.
The real kicker? You have to bring their feedback into your document and either act on it or explain why you chose not to. The feedback we got was generally useless: at best it was people pointing out UI bugs we already knew about, at worst it was a hot take dashed out 2 minutes before the feedback was due that suggested little to no reading comprehension on the reviewer’s part. At least we didn’t have to all meet at the same time like we did in 361.
Our CS340 project
We made a museum ticketing system. This project was a bit large for the time given but I enjoyed working on it.
In our app, you can add museums, add exhibits to museums, “sell” tickets to guests with a variety of exhibit entitlements, create new guests, add orders to existing guests, search for tickets by ID, date or transaction, view transactions, refund exhibit entitlements from tickets, and refund tickets themselves. You can also rename exhibits and museums, and update guest info.
We used Bootstrap on a node.js/Express/MySQL stack. (I’d have preferred to use an actual front-end framework but my partner was much newer to all this so we went with a nice big bowl of JQuery spaghetti instead.)
Here’s a few screenshots from our completed web app:
Our app’s default page – you can change which museum to view tickets and exhibits for.Here’s the “sell tickets” flow, where the user chooses which guest types to create tickets for as well as a visit date.The user can manage which extra exhibits each guest ticket should have access to. Review your order before proceeding…Enter guest info and complete the purchase! The ticket info is added to the database.The Transactions page shows all pages and provides links to individual tickets. In the Museums page the user views all museums and can choose to rename them.
Here’s one of the queries from the project that I wrote:
app.get('/get-transactions', function(request, response) { var context = {}; var queryStr = "SELECT tr.transaction_id, tr.trans_date, tr.trans_time, g.fname, g.lname, tr.pymt_type, GROUP_CONCAT(ti.ticket_id) AS ticket_ids, GROUP_CONCAT(ti.admission_type) AS guest_types "+ "FROM transactions tr "+ "JOIN guests g ON tr.guest_id = g.guest_id "+ "JOIN tickets ti ON tr.transaction_id = ti.transaction_id "+ "WHERE tr.museum_id = ? "+ "GROUP BY tr.transaction_id;"; pool.query(queryStr, [request.query.id], function(err, result, fields) { if (err) { console.log(err); return; }
GROUP_CONCAT is a neat trick we used to get a string of ticket IDs and admissions types back from the db (which you can then parse on the front-end).
My favorite parts of this class were when I got to do something new and exciting in SQL.
CS340: What’s missing?
I wish the class had covered any (or all) of these topics:
Non-relational databases
Input sanitization
Security
Stored procedures
Thread locks
Transactions
Advanced SQL (this class never goes further than a SELECT within a SELECT)
Best practices
And this is just “what I know I don’t know”.
If I were to redesign this course, I would give students a defined project (“Make a theme park ride ticketing system”) and provide a functioning front-end so the class can super deep dive into database-specific topics instead. I know databases don’t exist in isolation, but the sheer amount of front-end work it required to interact meaningfully with our data greatly overshadowed the database work.
A few final tips for CS340
The course is disorganized and the assignments never fall into a predictable “rhythm”, so double-check everything. Every week it’s something different: this week you turn in a PDF, the next week a .zip. Sometimes you turn it into Canvas, sometimes you post it to your “peer review” discussion group. Does it count for you and your partner or just you? It varies week to week. Is there a quiz that opened last week due this week? These aren’t difficult things to figure out, but they add a lot of “overhead” and I saw more than a few people going “OMG I thought that submission counted for both of us!!” in the Slack chat.
Take 290 first. Easily the best thing you can do for yourself to ensure success in CS340. The last 290 assignment will have you make routes for interacting with a database. You can use that work as boilerplate for your CS340 project and save yourself a ton of grief. Can you imagine taking 290 and 340 at the same time and being stuck on the same problem for both classes? Take 290 first! It should be a hard pre-req for 340.
Skip the lectures. They’re a mess. I mean, I won’t tell you how to live your life, but the lectures in this class are worthless. They won’t help you build your site, they’re thin on examples, and sometimes the topic they introduce was actually needed for the homework due last week so… yeah. I’m a diehard “watch the lectures no matter what” person and I gave up on them. It’s like they’re from a previous version of the course or something.
Don’t reinvent the wheel. Use Bootstrap (or similar) to make your front-end look nice, choose a project idea that lends itself to lots of pairings (customers to orders, people to tickets, etc).
Overall, I was disappointed by CS340. I’ve weathered other not-so-great courses and found the good in them, but this one was just a whole lotta making a bigger website than we made in 290 and writing a few SQL queries on the side. My database/SQL skills didn’t grow much in this course and I’m bummed that it didn’t live up to my expectations. My partner was awesome, though, so there was that. :)
This post is part of an ongoing series recapping my experience in Oregon State University’s eCampus (online) post-baccalaureate Computer Science degree program. You can learn more about the program here.
Six-word summary: :( :( :( :( :( :(
Web dev is, for some reason, this really polarizing thing in tech. I’ve certainly heard a lot of devs go “Ewww, JavaScript!” (both in my real life job and from my classmates). That’s too bad, because I think the web is really cool and it’s where a lot of people spend a lot of their time these days! I like building web apps, but I can see why some people don’t – it’s prone to “flavor of the week” syndrome, the tooling isn’t great, JavaScript does some things “weird”, etc.
I went into this class curious to see what aspects of web would be taught, since it’s such a broad topic to stuff into just 8 (or 11) weeks. Here’s some of what we covered in CS 290:
Git
This is the first OSU class I’ve had that covers git in any capacity (I’m halfway through the program). This is awesome – hooray, CS290, for introducing git!
I wish the OSU program covered it sooner. It has been frustrating to group with people in my previous classes who have never used it before and would rather use things like email (!!!) to share files because they don’t know git.
Unfortunately, 290 didn’t go very in-depth with git. We pushed two files to a Github repo in the first week and called it good. We literally never used git again. I think this was a huge missed opportunity: the class could easily include a group project of some sort that focuses on collaborating in a git repo, or require us to post incremental work on a project to our github repos, or something.
Quirks of JavaScript
The first three weeks of CS290 focused heavily on “this weird thing JavaScript does”. The usual suspects are here: lack of strict typing, hoisting, closures. It’s not that these things aren’t important, it’s that they aren’t what makes web development compelling or useful. Starting the class out by spending three weeks on these topics just seemed to make JavaScript look weird and annoying, when in practice, these things aren’t that big a deal.
I think it’d have been cooler if they set us to actually making things and learning the tools of the trade in those first three weeks. In the accelerated schedule, week 4 is when it got interesting: we made an HTML website with JavaScript methods to navigate around in a table and mark cells yellow.
Week 4 homework: a bare-bones interactive “website”. This is the first step in building the kind of stuff that makes the web compelling!
Installing npm packages on a server
They had us do this in week 1 – OSU provides some server space, and everyone was tasked with claiming a port and setting up a little server on it.
We never came back to it. I don’t know why we did this so early in the class. Node and its (infinite) packages is an interesting topic and it’s weird to just install it and never come back to it. It was like a story that someone started telling and never finished.
Some light database stuff and routing with Express
This part was fun – make routes (like “/get”) and make them return data from a class-provided database. This work will be extremely useful as starter code when you take CS340 (Databases) so keep it somewhere safe.
The biggest, most complex project of this class is the one where you develop backend routes for database interaction. You’ll spend a lot of time on form validation and making rows in a table switch between a read-only state and an editable state. This is also the project I thought was the most interesting of all of them, since it was the most like a real site.
What CS290 didn’t cover
Sadly, there was no mention of Chrome’s various debugging tools, running node locally, front-end frameworks like React, the difference between running JavaScript on the front end and the backend, the staggering quantity of problems that have already been solved with neat existing NPM packages, unit testing, integration testing, and deployment.
Somewhat irritatingly, some of the assignments had what I would consider poor coding practices. The second assignment (sorting automobiles) in particular irked me because it makes unnecessary copies of an array:
/*This function sorts arrays using an arbitrary comparator. You pass it a comparator and an array of objects
appropriate for that comparator and it will return a new array which is sorted with the largest object in index 0
and the smallest in the last index*/
function sortArr( comparator, array ){
//returning a new array to satisfy assignment requirements; we could have run sort on array itself (it's passed by reference)
var sortedArr = array.sort(comparator, array);
return sortedArr;
}
Arrays are passed by reference; there was no need to create a new one and return the new one. In fact, we could have run .sort() in place instead of calling a completely separate method for it. Maybe I’m just cranky, though.
The workload in weeks 1, 2, 3, and 4 is very low, but then things pick up after that.
CS290 final exam
Whoever wrote this exam does not know what is important in web development.
I’ve used JavaScript (both as a hobbyist and a professional) for over half a decade, and I got one of the lowest scores I’ve ever gotten on a test here. I don’t know what to say – expect a ton of oddly-worded bullshit questions about tricky trivia that have no relevance to how JavaScript is used or real life web development practices.
CS290 parting thoughts
I can only guess what this class is like for someone who is new to web development. It’s probably a disjointed pastiche of topics that get introduced in a vacuum and then quickly abandoned. I’m sure this class isn’t helping anyone become enthusiastic about web development, which is too bad.
For a better introduction to modern web development consider building your own site. I think that’s how a lot of us got started – we wanted a website for some reason or another and set one up. There’s plenty of project starters (known as ‘boilerplate’) out there to pick from. Here’s what I would recommend…
Buy some $5/month shared hosting and make your own portfolio site out of HTML and your own CSS. Once you’ve got that…
Start up a node server on your own computer and get it to serve your own project
Build a simple one-page app that does a simple job using a front-end framework such as Angular or React (here are some ideas: a text capitalizer, a shipping price calculator, an anagram solver)
Use a popular front-end styling framework, such as Bootstrap
Realize what you made is garbage and start over
Repeat a bunch of times
Keep Googling any time you get stuck
If you build something decent, deploy it somewhere like Heroku and show it off!
This post is part of an ongoing series recapping my experience in Oregon State University’s eCampus (online) post-baccalaureate Computer Science degree program. You can learn more about the program here.
Six-word summary: Group work group work group work
In CS361 you’ll get a high level look at “real world” scheduling methodologies (mostly waterfall and agile) and you’ll work in a group with 3-4 other students to meet weekly milestones designing and implementing parts of some other student’s “Vision Statement”.
CS361 Review
You don’t have to spend long on the OSU CS subreddit to realize that virtually no one likes this class. It’s not awful, but I understand the frustrations people voice on various forums around the web.
The heavy reliance on group work was frustrating more often than not and the course materials felt dated or like they were specific to a certain industry, but I didn’t dislike this class as much as most people seem to. I think it helped that I already have design and software development experience and enjoy writing and making diagrams/mockups, so this class played to some of my strengths.
The materials that introduce common planning and scheduling techniques for software projects were a welcome inclusion – I’m glad this stuff is covered somewhere in OSU’s CS program – but I thought they didn’t go nearly in depth enough to prepare students for the realities of working on an agile team. There wasn’t enough story writing, requirements gathering, pointing exercises, or customer involvement.
I thought the weekly homework assignments were a little lackluster. Working in a group is tough even in the best situations – some parts of the homework depended on other parts being done first, and some people’s schedules didn’t seem to allow for them to start the homework early in the week.
The documents we wrote as a group seemed excessively heavy on diagrams and put too much emphasis on satisfying a very specific set of expectations. For example, there’s a lot of emphasis placed on terminology such as “functional requirements” and “functional definitions”, which I had never heard outside of this class or seen used so religiously, but the concepts they represent were familiar. That describes a lot of this class’s materials: heavy focus on overly-specific methods and terms that probably don’t translate to every industry.
Maybe the course’s materials would be improved by taking a step back from strict terminology and definitions and talking instead about how to write good step-by-step documentation, how to write a good bug, how to write a good feature design that someone else can implement from – skills that can be applied to a variety of specific methodologies, since it’s impossible to predict which ones your future company or team might be using. There are so many skills that have nothing to do with programming that programmers still need to develop, and this class could be a good place to start learning them.
Class structure
In the first week of the class, everyone in the class writes a 2000 word “Vision Statement” for a software product that solves some lofty real-world problem. Forget about making a simple app to solve a simple problem, your idea for this vision statement should be utterly epic. They are surprisingly strict about the 2000 word count, but you should be able to hit that easily by showing off your design skills and covering every topic imaginable in relation to your app idea. You really can’t write too much, and no topic is too trivial to not write a page about. (I thought I’d covered security pretty well with the half page I wrote on it, but I got got dinged for not writing enough on the topic. I got the feeling the TA had to find something wrong with my document and if it wasn’t that, it’d have been something else.)
In the second week of the class, everyone votes on which ideas they think are best.
It doesn’t matter what you vote for. Your voting has no bearing on what project you get assigned. But you should vote anyway to help lift decent-sounding projects to the top, so that nobody has to work on the duds.
Expect to be assigned to a project you didn’t vote for because you thought it sounded stupid or impossible (or both).
You’ll then get grouped with 3-4 classmates based on absolutely no criteria whatsoever, so expect clashing schedules/mismatched interests/time zone incompatibilities. The instructor says this is part of life, and I agree (and every single software team I’ve been on has had an off-shore counterpart on the other side of the globe), but don’t expect your teammates to be so understanding. My group insisted that the only time we could meet was what was usually my bedtime, which sucked for me.
You’ll get to know these people very well as you meet 1-2 times a week (probably over a voice chat if your group is keyboard-phobic or generally unavailable at any time of day outside of the specific meeting window)
Every week you’ll work with these people to produce a lengthy document in response to a lengthy prompt. It will require diagrams and lots and lots of writing.
This assignment will be graded by a TA who might have limited English skills or a general lack of interest in reading 12+ pages of rather dry writing. We lost points on things that were present and the TA missed and we lost points on things that were never part of the requirements in the first place.
The last two weeks of the term are spent coding a small portion of the stuff you designed thus far; your group members may or may not participate in this process depending on whether they’re dirtbags or not
The final is made up of rather vague questions, but you should review the slides anyway to scoop up whatever points you can here
CS361 Tips
Vision statement tips
The grading requirements on the vision statement draft are really vague, but you can get full credit by writing a ton on every design topic you can think of and meeting the 2000 minimum word requirement.
Some ideas of what to include (beyond what the assignment suggests):
What differentiates your app from similar ones – do some market research and write comparisons. Someone’s probably already made a product like the one you’re imagining. What makes yours better?
User profiles – Imagine some hypothetical users for your app and write about them. Are they young? Old? Tech-savvy? Tech-illiterate? How is your app designed to appeal to them and meet their needs?
Accessibility features – imagine how your app might work on a screen reader or to someone with limited vision and write about how accessibility concerns are addressed in your app.
Security features – I wrote like half a page on security, which wasn’t enough according to my TA. Maybe you can do better!
Work on the journal regularly – every other day is a good pace. The class’s instructor looks at these himself (or at least he looked at mine himself and commented on it) and he’s very good at detecting who wrote theirs in one fell swoop the night before it was due.
If you don’t know what to write, here are some ideas I used throughout the course to inspire myself:
Draw a comparison between the class’s material and your experiences working in a team – you ought to have some from your previous career or OSU classes
Talk about any previous software development experience you have; maybe throw in a bit about how you think CS361’s teachings on topics like agile will help you on future projects you develop
Talk about how your group work is going
Relate the lecture material to outside reading you’ve done or things you’ve heard
Sometimes the lecturer asks questions in the video; respond to those
Respond to the weekly learning topics: early in the week, write what you think they mean, then, after you do the lectures and your part of the homework, write again about what you’ve learned about those topics and correct any misinterpretations you had initially
Track your group members’ contributions
Yes, it feels creepy to keep secret notes about who in your group isn’t attending meetings, who turned in their part just hours before it was due, etc., but in the last week you’ll be asked to produce a very long, very detailed documentrating each group member on a half-dozen criteria and justifying your rating in writing, so having kept track of this stuff will help you earn full credit on the assignment. I did my group member tracking in a Google Spreadsheet with a column for each week of the class and a row for each group member.
A lot of people in the Slack channel reported getting dinged for not being detailed enough, so keep regular notes and you should have plenty of material for this document and you should be able to write it in very little time. (Mine was 14 pages and included screenshots and data about meeting attendance and how close to the weekly deadline each person submitted their work; I got full credit on the group evaluation.)
Pick a programming language / framework that plays to your group’s strengths
Three people in my group inexplicably voted in favor of a framework they had little to no familiarity with – and majority ruled. I spent 2 weeks giving myself a crash course in JavaFX, coding as I went, which was fine but our development weeks would have gone so much better if the group had just picked something we already knew and could’ve hit the ground running in. The end result: some group members struggled to produce anything at all during the coding weeks.
Here’s what we ended up with: a clickable map of the United States that colors states according to how they voted in the 2016 presidential election and, alternatively, according to how gerrymandered they are.
This screenshot best represents my portion of the work: building the map and hooking it up to real data.
Implementing this much functionality posed plenty of interesting challenges to work through. Things like building a complete map out of individual SVG boundaries, figuring out how to make them clickable, altering their color based on data from the project’s database, and fitting containers within containers to get everything fitting in the application window kept me busy for the two weeks.
For some people in my group this was their first exposure to Git as well, so this project came with a side-helping of Git training. (Note to any future students out there: if you don’t know git yet, start learning it now – don’t wait until you’re in a time crunch of a group project with multiple people counting on you.)
And finally…
Don’t be a dick
Show up to meetings. Do your part and do it early enough so that your group can review it. Don’t disappear during the coding weeks. Be a good team member and make connections on LinkedIn once the class is over.
An educational program like this one is a huge opportunity to network and make friends; you never know who might end up at a great company someday and put in a good word for you. You can gripe about 361 and sandbag for two months, or you can impress a bunch of future industry peers by knocking it out of the park every week.
This post is part of an ongoing series recapping my experience in Oregon State University’s eCampus (online) post-baccalaureate Computer Science degree program. You can learn more about the program here.
Six-word summary: Where my 4.0 GPA went to die
CS271 is a pedantic deep-dive into your computer’s inner workings and an opportunity to enjoy coding in a highly restrictive language. There’s special emphasis on going step-by-step through the stack frame and understanding what’s in every register and even some much-appreciated training on “what order to do things in” when building a program.
CS271 Review
CS271 often felt like it was made of two distinct halves that ran in parallel: the first half is made up of the cute little MASM programs you write for the homework that’s due every other week. The other half is the mountains of computer architecture trivia and methods for calculating various things you learn for the bi-weekly exams, such as binary/hex conversions, Hamming codes, memory usage, optimization, recursive output, stack frame changes, the step-by-step changes in registers as a program runs or steps through a loop, and so on.
The class is very well organized. They tell you precisely what to do for the homework and what the output should look like, line by line. Unlike many classes in OSU’s CS program thus far, you won’t need to do a ton of Googling to learn the material – the lectures and the book reading are actually adequate preparation for most of the class’s homework and quiz questions. The workload is consistent. Each week follows the same pattern, and the homework’s complexity ramps up slowly.
However, the homework (in which you write some Assembly language code) is rather light and may give you a false sense of security come quiz and exam time. The true heavy hitters in this class are the self-checks you do after the lectures, the weekly exercises, and the bi-weekly quizzes. Mastering the material found in all of these is essential for surviving the midterm and the final.
Whether 271’s material is interesting is going to depend on your own likes and dislikes. I thought most of it was squarely in the “hey, that’s neat” category, but I thought it focused too much over low-level details that (probably) won’t directly enhance my career in software. (And that’s just like, my opinion, man – I’m sure some people who take 271 find their calling and never resurface from the depths of CPU architecture, binary math, hex addresses, and bit ordering.)
Class structure
10 weeks
Multiple briskly-paced weekly lectures
An ungraded/untimed “self-check” exercise worksheet for every single lecture – you should actually do these, the quizzes and exams pull from them
A weekly exercise quiz with a 6 hour time limit – you get two attempts and they keep the best score, but each attempt has a different batch of questions so it is advised to take it twice to see both question banks
4 bi-weekly tests, 1-hour time limit, each worth 2.5% of your final grade
6 Assembly-language coding projects (homework assignments) total – each one gives you two full weeks to work on it, with the grading rubric released at the start of the 2nd week
Proctored midterm, proctored final
Steady, even workload
Less self-teaching than some OSU classes (still quite a bit of rote memorization and practice, though)
NO GROUP PROJECTS!
Tips for CS271
This was my first OSU CS class where I couldn’t quite earn a solid A (I got an A-). It certainly wasn’t for lack of effort or time put in – I think I cleared 20 hours of practice most weeks and I worked on this class’s stuff daily.
There’s a ton of material and the tests are very picky – they’re not multiple choice where half the answers are obviously silly, they’re fill-in-the-blank or multiple choice where all the options seem like they could be right. (The tests are also almost half your final grade. Ouch.)
When I look back on what I could’ve done better and what I would advise future students, these are the things that come to mind.
CS271 tip #1: Get the book, it doesn’t suck!
This is one of the books that’s worth buying. It’s approachable with many examples to follow and, surprisingly, many quiz questions are lifted line-for-line from the book.
I liked having a physical book because it freed up screen space during quizzes and while working on homework. I found it helpful to read on paper, practice in a notebook, and really work problems over and over until I had the process down cold. (That’s just my personal preference; I seem to retain more if I read and work on paper.)
CS271 tip #2: Make yourself some worksheets and grade yourself
Speaking of rote memorization and brute-force practice, I highly recommend making yourself some worksheets out of the weekly self-checks and bi-weekly quizzes. Print them out and work through them (over and over) until you can do all of them quickly and perfectly.
This technique was time-consuming but it went a long way to cementing the steps to solving all the various types of CS271 problems. As I mentioned earlier, the homework is borderline useless for the exams. The exams draw their questions almost entirely from the weekly self-checks and bi-weekly quizzes.
The exams tend to layer multiple concepts together into one question and they’re autograded, not graded by a potentially generous TA, so your goal for CS271’s tests should be to become very fast at solving every kind of problem you encounter in the practice materials.
CS271 tip #3: Get a binary/hex calculator
The Casio fx-115ES can do math in binary and hex: addition, subtraction, and conversions between binary/hex and back again.
I had no idea this kind of calculator even existed and the course materials make no mention of it. Frustratingly, I only found out about it through the class’s Slack chat. I was doing conversions by hand like a total chump, which would have cost me dearly on the midterm either in terms of time spent or stupid mistakes or both. The hex and binary questions on the exam were made trivial by having this calculator. I don’t know why the syllabus doesn’t open with “GET THIS CALCULATOR”.
As an alternative to the physical calculator, the course lets you use your operating system’s built-in calculator. (I did this course’s work on my PC but I take tests via ProctorU on Macbook since that’s where my webcam is, so I preferred the physical calculator over having to get familiar with multiple OS calculators.)
CS271 tip #4: Pack that cheat sheet to the density of a neutron star
I made mine in Google Docs, which will let you pick a font size as small as 6 (you have to type it in, it’s not in the dropdown).
One side of my CS271 cheat sheet – the back side was all code examples.
I don’t care for exam cheat sheets. I think allowing cheat sheets drives students to put their efforts into guessing what details should be on the sheet, which sets the student up for an inevitable wave of frustration and disappointment when they realize 2 seconds into the exam that they guessed wrong. Letting students bring a cheat sheet seems to inspire instructors feel free to ask all kinds of minutia-focused questions instead of testing for a more general understanding of the concepts.
But… nobody asked my opinion, and I doubt the cheat sheets are going away any time soon, so my advice here is to pack your sheet as full as you can get it. I think a good cheat sheet for CS271’s midterm and final would be at least 50% code examples, which is what the back side of my sheet was full of.
CS271 tip #5: The extra credit on the homework was generally a waste of time for me
I tried to do the extra credit (of which there are 1-3 points up for grabs on every bi-weekly assignment), but for the most part I found the extra credit opportunities frustrating and almost as time-consuming as the rest of the assignment itself. Your mileage may vary, but I should’ve spent the time on worksheet drills instead.
CS271 tip #6: If I could do one thing differently…
I’d spend more time studying all the nuances of what happens in the system stack while a program runs a loop. Here’s me practicing on a whiteboard, but despite all this preparation I still think this is where I lost points on the exam. I was probably off by 4 on some memory address or miscounted loops somewhere.
And that’s it for CS271! I’m glad I’m done with it; I’ve heard it’s one of the tougher courses and for me, that was definitely true. I worked very hard in this class and I advise all future students to do the same. The tests are no joke and your ability to track and manage tiny details will be tested like never before.
Next up: CS290 – Web Development. See you all next quarter!
Here is my technique for solving the problem of converting a 4-byte hexadecimal sequence in a little-endian architecture into decimal.
This may seem rather niche but it was a surprisingly large part of Week 5 in my CS271 class. The class’s materials and extra help I found around the web seemed to go off on tangents that were interesting but unrelated to solving this kind of problem quickly, and all I really wanted was a simple step-by-step guide I could use on exams.
Therefore, I am sharing my simple 5-step technique for converting hex to decimal in a little-endian architecture here! Hope someone else finds it helpful.
Example problem:
The four-byte sequence 0x86 0x65 0x53 0x82 stored in consecutive memory cells in a little-endian architecture represents ___________ (decimal) when interpreted as a 32-bit signed integer.
From reading this, we know:
it’s little-endian, so we are going to reverse the order of the bits
our result will be signed
Step 1: Reverse the bytes
Take the bits in blocks of two and work right to left.
0x86 0x65 0x53 0x82 becomes 0x82536586
Step 2: Look at the most significant bit and determine if there will be a negative result
0x82536586 <-- that's this dude in red here
The most significant bit here contains an 8.
We know that in hex a most-significant bit of 7 or more means we are looking at a negative number. (If this were a positive number, ie: the most significant bit is between 0 and 6 inclusive, then skip ahead to Step 4.)
Step 3: Since we are working with a negative number, flip the bits (subtract our hex sequence from FFFFFFFF) and add 1
  FFFFFFFF
- 82536586
  7DAC9A79
Add one to the result:
7DAC9A79
      +1
7DAC9A7A
The result is the hex sequence we will use for the next step.
7DAC9A7A
Step 4: Multiply each term by 16 raised to a power
To convert a hex value into a decimal value, we multiply each “position” in the hex sequence by 16 raised to a power. Working from right to left, we know that furthest-right position is 16^0 (so, just a 1). The second-from-right position is 16^1 (so, just a 16). The third-from-right position is 16^2, and so on.
Recall that A = 10, B = 11, C = 12, D = 13, E = 14, and F = 15 when working in hex.
Remember that negative sign? Now’s a good time to stick it on.
-2108463738
And there you have it: the result is -2108463738.
Some final notes
Be sure to observe whether the problem expects a signed decimal result or an unsigned decimal result. If the problem is asking for unsigned, you can skip the FFFFFFFF subtraction step entirely, even if the most significant bit is 7 or higher.
Remember that when working with a signed hexadecimal number, you look at the most significant bit to determine if it’s negative or positive.
0-7 = positive
8-F = negative
If you had to do the flipping step, don’t forget to put that negative sign onto your final answer!